
With low-code and no-code development tools, anyone can be a developer. Right?

That depends. While working in low-code/no-code tools may feel like you’ve unlocked the power of the digital universe, there are still many projects that require traditional full-code solutions.
According to Zapier’s recent no-code report, over 50% of no-code users started in the past year, many of whom are self-taught. Industry analysts also expect that by 2025, over 70% of the applications organizations develop will rely on no-code/low-code tools. That’s not surprising, given that these tools lower the barrier to entry – and the cost – of developing new sites and apps.
With a slew of effective low-code/no-code solutions on the market today, the question isn’t whether you should use no-code/low-code tools to evolve your digital footprint. It’s how and when you should use them so that the tools work for your organization, not against it.
What Is Low-Code/No-Code?
There are three ways to build websites or apps: full-code, low-code, and no-code. Developers hold the keys to the proverbial full-code city, but low-code and no-code open the door to people without a coding background.
While it’s tempting to brush off low-code and no-code as “same same but different,” the differences do matter. Understanding what they are and how they work will help you choose the best route for whatever digital property you need to build.
Low-code development
Low-code development uses APIs, drag-and-drop tools, code and process templates, and more to help build websites, apps, and workflows. These tools typically require some coding skills, but nothing like what you’d need to create a full-code solution. That makes it much quicker and easier to create a product using low-code development than writing all of the code from scratch.
No-code development
No-code development uses visual builders and other simple tools that allow people without any coding skills to build digital experiences. Through drag-and-drop, visual flows, and templated plug-ins, you can build something beautiful without having to touch the code at all. They’re one step more accessible than low-code solutions, making them compelling options for organizations that need fast and cost-effective development.
Pros and Cons of Low-Code/No-Code Development
Low-code/no-code tools take a lot of the time, cost, and aggravation out of traditional development – but they’re not a cure-all for your coding challenges. Before you dive in, keep their strengths and limitations in mind.
Pros of low-code/no-code
- Speed to market: Your path to launch is much quicker with low-code/no-code tools. Stand up a simple brochure-style website or multi-step workflow in a matter of hours, rather than weeks or even months.
- Less expensive: Many businesses are on a budget that can’t flex for an experienced developer. Both low-code and no-code tools can deliver an effective product at a fraction of the price. Once you’ve built your site, you can also rely on your internal team to tweak the copy or update an image down the road instead of hiring outside help.
- Expansive options: The low-code/no-code tools on the market have expanded along with their user base. There are more options than ever before, with themes and plug-ins that look so sleek you’d think they were full code.
Cons of low-code/no-code
- Limited customization: You can create something appealing with no-code/low-code options. But will it totally look and feel like your brand? Probably not. Because these tools are designed to be easy to use, they don’t have the custom capabilities you’ll get through coding.
- Somewhat breakable: Low-code/no-code tools do use code, it’s just written and templated by someone else. That means that if you don’t use the features correctly, you can break the code – and you might still have to call in a developer to make important fixes.
- Time intensive: Drag-and-drop may sound simple, but getting it just right can actually be a time suck for people with minimal web dev skills. You may end up spending more time on your site or app than if you hired someone with development experience.
When Should You Use Low-Code/No-Code Tools?
For simple projects where hitting budgets and timelines is more important than highly customized design, low-code/no-code tools can be a great solve. They’re especially good for:
- Proof-of-concept builds: Looking to stand up a site or app for a new product? Rather than spending months on traditional development (and losing precious time in the market), low-code/no-code tools allow you to build the core functionality, test your idea with users, and gain buy-in or funding from key decision-makers. If you pick the right tool, your MVP could even serve as the foundation for a larger build later.
- Creating simple websites and apps: For basic builds like customer portals, knowledge centers, or bug ticketing systems, you don’t need to recreate the wheel. Low-code/no-code tools offer tons of templates that make it easy to launch straightforward digital experiences.
- Updating an existing digital experience: Thanks to the bevy of CMS tools out there, you can hire a developer for an initial build and have them set up CMS functionality for simple updates later. This hybrid approach gives you the freedom to adapt your site or app as your organization evolves, while still maintaining a custom look and feel.
- Reporting dashboards and workflow automations: Need a new setup for your business intelligence? Since dashboards and workflows are mainly built for internal users, achieving a custom look isn’t typically a priority – and options abound for automating virtually any task.
What Should You Look For in a Low-Code/No-Code Tool?
Before you choose a solution, consider whether anyone on your team has basic coding skills. If yes, low-code tools may be up your alley. If not, consider narrowing your focus to the many no-code tools around.
Whichever route you go, look for these features in both low-code and no-code tools:
- An extensive marketplace: Because low-code and no-code solutions aren’t very customizable, look for a tool with robust built-in features. You’ll want to be able to choose from a diverse set of additional features, tools, and pre-built APIs that integrate with any tech you need.
- Integration support: You may need custom code solutions here and there. Make sure the low-code or no-code tool you choose will allow you to add extra code.
- Visual builder tools: With these tools, you’ll be able to edit the user interface and not the back end, which is key if you want an approachable no-code/low-code tool. Look for drag-and-drop capabilities that can be used to create things like data workflow mapping or dashboard building. Without that, you may still need someone with development experience.
- Granular permission systems: Your website shouldn’t be an open door. Look for low-code/no-code tools that allow you to restrict access to certain apps and data sets by assigning different permissions to different users (administrators, edit access, view-only, etc.).
When Should You Bring in an Agency To Build a Full-Code Solution?
Sometimes, only a custom or full-code solution will do. The more unique you want your digital property to be, the more likely it is that you’ll need to call in an expert. We also suggest you look for support if:
- You have a complex digital environment: If you need a site with hundreds of pages or a multisite architecture, you’ll probably need a custom solution to get the results you’re looking for.
- You need a custom feature: Low-code/now-code tools aren’t bottomless wells of features and plug-ins. If you need a unique-to-you feature or integration that isn’t readily available, it’s time to call in someone who can build one.
- You need a custom user interface: Cookie-cutter templates won’t work for all brands and products. If you need a specific user interface, you may not be able to achieve that within even a low-code platform.
- You want the product to be proprietary: Low-code/no-code products must be hosted within a specific low-code/no-code platform. You’ll need a custom, full-code solution if you want to own the product and sell it as a proprietary tool.
Get Help Leveraging the Right Tools for the Right Projects
You wouldn’t build a house on shaky ground, would you? Then why build an experience on a platform that might not actually be able to support it?
Though no-code/low-code tools certainly democratize the web development market, they aren’t a silver bullet. If you know that whatever you’re building is simple enough that a no-code/low-code tool and your existing team can support it, we say go for it.
But if you’re even a little uncertain, consider getting an outside opinion on how to lay a strong foundation for your next development project.
Want help deciding whether no-code, low-code, or full-code is best for you? We’d love to talk with you about your needs.
More than two years after Google announced the launch of its powerful new website analytics platform, Google Analytics 4 (GA4), the final countdown to make the switch is on.
GA4 will officially replace Google’s previous analytics platform, Universal Analytics (UA), on July 1, 2023. It’s the first major analytics update from Google since 2012 — and it’s a big deal. As we discussed in a blog post last year, GA4 uses big data and machine learning to provide a next-generation approach to measurement, including:
- Unifying data across multiple websites and apps
- A new focus on events vs. sessions
- Cookieless user tracking
- More personalized and predictive analytics
At Oomph, we’ve learned a thing or two about making the transition seamless while handling GA4 migrations for our clients – including a few platform “gotchas” that are definitely better to know in advance. Before you start your migration, do yourself a favor and explore our GA4 setup guide.
Your 12-Step GA4 Migration Checklist
Step 1: Create a GA4 Analytics Property and Implement Tagging
The Gist: Launch the GA4 setup assistant to create a new GA4 property for your site or app. For sites that already have UA installed, Google is beginning to create GA4 properties automatically for them beginning in March 2023 (unless you opt out). If you’re migrating from UA, you can connect your UA property to your GA4 property to use the existing Google tracking tag on your site. For new sites, you’ll need to add the tag directly to your site or via Google Tag Manager.
The Gotcha: During property setup, Google will ask you which data streams you’d like to add (websites, apps, etc…). This is simple if you’re just tracking one site, but gets more complex for organizations with multiple properties, like educational institutions or retailers with individual locations. While UA allowed you to separate data streams by geography or line of business, GA4 handles this differently. This Google guide can help you choose the ideal configuration for your business model.
Step 2: Update Your Data Retention Settings
The Gist: GA4 lets you control how long you retain data on users and events before it’s automatically deleted from Google’s servers. For user-level data, including conversions, you can hang on to data for up to 14 months. For other event data, you have the option to retain the information for 2 months or 14 months.
The Gotcha: The data retention limits are much shorter than UA, which allowed you to keep Google-signals data for up to 26 months in some cases. The default retention setting in GA4 is 2 months for some types of data – a surprisingly short window, in our opinion – so be sure to extend it to avoid data loss.
Step 3: Initialize BigQuery
The Gist: Have a lot of data to analyze? GA4 integrates with BigQuery, Google’s cloud-based data warehouse, so you can store historical data and run analyses on massive datasets. Google walks you through the steps here.
The Gotcha: Since GA4 has tight time limits on data retention as well as data limits on reporting , skipping this step could compromise your reporting. BigQuery is a helpful workaround for storing, analyzing and visualizing large amounts of complex data.
Step 4: Configure Enhanced Measurements
The Gist: GA4 measures much more than pageviews – you can now track actions like outbound link clicks, scrolls, and engagements with YouTube videos automatically through the platform. When you set up GA4, simply check the box for any metrics you want GA4 to monitor. You can still use Google tags to customize tracking for other types of events or use Google’s Measurement Protocol for advanced tracking.
The Gotcha: If you were previously measuring events through Google tags that GA4 will now measure automatically, take the time to review which ones to keep to avoid duplicating efforts. It may be simpler to use GA4 tracking – giving you a good reason to do that Google Tag Manager cleanup you’ve been meaning to get to.
Step 5: Configure Internal and Developer Traffic Settings
The Gist: To avoid having employees or IT teams cloud your insights, set up filters for internal and developer traffic. You can create up to 10 filters per property.
The Gotcha: Setting up filters for these users is only the first step – you’ll also need to toggle the filter to “Active” for it to take effect (a step that didn’t exist in UA). Make sure to turn yours on for accurate reporting.
Step 6: Migrate Users
The Gist: If you were previously using UA, you’ll need to migrate your users and their permission settings to GA4. Google has a step-by-step guide for migrating users.
The Gotcha: Migrating users is a little more complex than just clicking a button. You’ll need to install the GA4 Migrator from Google Analytics add-on, then decide how to migrate each user from UA. You also have the option to add users manually.
Step 7: Migrate Custom Events
The Gist: Event tracking has fundamentally changed in GA4. While UA offered three default parameters for events (eventcategory, action, and eventlabel), GA4 lets you create any custom conventions you’d like. With more options at your fingertips, it’s a great opportunity to think through your overall measurement approach and which data is truly useful for your business intelligence.
When mapping UA events to GA4, look first to see if GA4 is collecting the data as an enhanced measurement, automatically collected, or recommended event. If not, you can create your own custom event using custom definitions. Google has the details for mapping events.
The Gotcha: Don’t go overboard creating custom definitions – GA4 limits you to 50 per property.
Step 8: Migrate Custom Filters to Insights
The Gist: Custom filters in UA have become Insights in GA4. The platform offers two types of insights: automated insights based on unusual changes or emerging trends, and custom insights based on conditions that matter to you. As you implement GA4, you can set up custom insights for Google to display on your Insights dashboard. Google will also email alerts upon request.
The Gotcha: Similar to custom events, GA4 limits you to 50 custom insights per property.
Step 9: Migrate Your Segments
The Gist: Segments work differently in GA4 than they do in UA. In GA4, you’ll only find segments in Explorations. The good news is you can now set up segments for events, allowing you to segment data based on user behavior as well as more traditional segments like user geography or demographics.
The Gotcha: Each Exploration has a limit of 10 segments. If you’re using a lot of segments currently in UA, you’ll likely need to create individual reports to see data for each segment. While you can also create comparisons in reports for data subsets, those are even more limited at just four comparisons per report.
Step 10: Migrate Your Audiences
The Gist: Just like UA, GA4 allows you to set up audiences to explore trends among specific user groups. To migrate your audiences from one platform to another, you’ll need to manually create each audience in GA4.
The Gotcha: You can create a maximum of 100 audiences for each GA4 property (starting to sense a theme here?). Also, keep in mind that GA4 audiences don’t apply retroactively. While Google will provide information on users in the last 30 days who meet your audience criteria — for example, visitors from California who donated more than $100 — it won’t apply the audience filter to users earlier than that.
Step 11: Migrate Goals to Conversion Events
The Gist: If you were previously tracking goals in UA, you’ll need to migrate them over to GA4, where they’re now called conversion events. GA4 has a goals migration tool that makes this process pretty simple.
The Gotcha: GA4 limits you to 30 custom conversion events per property. If you’re in e-commerce or another industry with complex marketing needs, those 30 conversion events will add up very quickly. With GA4, it will be important to review conversion events regularly and retire ones that aren’t relevant anymore, like conversions for previous campaigns.
Step 12: Migrate Alerts
The Gist: Using custom alerts in UA? As we covered in Step 8, you can now set up custom insights to keep tabs on key changes in user activity. GA4 will deliver alerts through your Insights dashboard or email, based on your preferences.
The Gotcha: This one is actually more of a bonus – GA4 will now evaluate your data hourly, so you can learn about and respond to changes more quickly.
The Future of Measurement Is Here
GA4 is already transforming how brands think about measurement and user insights – and it’s only the beginning. While Google has been tight-lipped about the GA4 roadmap, we can likely expect even more enhancements and capabilities in the not-too-distant future. The sooner you make the transition to GA4, the sooner you’ll have access to a new level of intelligence to shape your digital roadmap and business decisions.
Need a hand getting started? We’re here to help – reach out to book a chat with us.
Was this blog written by ChatGPT? How would you really know? And what impact would it have on Oomph’s site if it were?
Yes, we know there are some great AI-detecting tools out there. But for the typical reader, picking an AI article out of a crowd can be challenging. And with AI tools like ChatGPT delivering better-quality results than ever, many companies are struggling to decide whether to hand their content and SEO reins over to the machines.
While AI can add value to your content, companies should proceed with caution to avoid some potentially big pitfalls. Here’s why.
Quality Content Is Critical to SEO
All the way back in 1996, Bill Gates said “Content is King.” This phrase became ubiquitous in the early years of SEO. At that time, you could rank well simply by writing about a search topic, then optimizing your writing with the right keywords.
Since then, search algorithms have evolved, and the Google search engine results page (SERP) is more crowded than ever (not to mention the new continuous scroll). While ranking isn’t as easy as it used to be, content – whether it’s a video, an image, a product, a blog, or a news story – still matters. When content ranks well, it’s an ad-spend-free magnet for readers that eventually become customers and subscribers. What else on your website can do that?
That makes your content special. It also puts a premium on producing a high volume of relevant content quickly. For years, brands have done this the old-fashioned way: with copywriters and designers researching, writing, revising, creating images, and publishing ad infinitum.
Until AI.
AI-Powered Content Generation Changes How We Make Content
There’s no point in denying it: AI will impact SEO. But it’s still up for debate just how deep that impact will be.
The rise of AI-powered language processing tools like ChatGPT and DALL-E makes quick content generation a reality. They can easily produce high-quality content that will likely only get better with time. ChatGPT can produce an article in minutes, not hours, and even suggest keywords for you.
For all those reasons, marketers have embraced these new tools – ChatGPT shattered records when it reached 100 million daily active users in a mere two months. As the saying goes, though, just because we can, doesn’t mean we should – especially if using it means compromising on quality or losing what makes us, well, us.
After all, AI is a tool, not a replacement human. If you’re considering integrating AI into your martech stack, here’s what to keep in mind.
4 Things to Know Before Using AI for Content
1. Google may ding you.
In August 2022, Google released an algorithm update called the “helpful content update.” You can read more on Google’s blog, but what’s important is this: Google prioritizes content by people, for people.
In other words, using AI solely to churn out articles that feed the search engine beast won’t work. You should continue to create content that puts your audience first, is genuinely helpful, and is 100% unique to your brand.
But Google’s stance does beg the question: Will they really know if you used AI to generate your content? Well, they do have a very special set of skills…

While AI content can be good quality and easy to read, tools like Crossplag’s AI Content Detector and OpenAI’s GPT-2 Output Detector can detect whether something is written by a human or by an AI bot. That comes down, in part, to the fact that AI lacks EEAT – experience, expertise, authority, and trust – which is not just a major factor in SEO, but a major reason why people consume content in the first place.
2. AI isn’t always accurate.
AI culls information from across the web, and it’s remarkably good at it. But aggregating massive amounts of information isn’t the same as fact-checking. AI tools often get it wrong – even with easily verifiable, fact-based questions.
Take the question: What is the largest country in Central America that isn’t Mexico?
AI’s answer:
The largest country in Central America that isn’t Mexico is Guatemala. Guatemala has an area of about 108,890 square kilometers, making it the largest country in Central America by land area. It is bordered by Mexico to the north, Belize to the northeast, Honduras to the east, El Salvador to the southeast, and the Pacific Ocean to the south.
Google’s answer:
Nicaragua is the largest country in the subregion, with a total area of over 130 thousand square kilometers, followed by Honduras, with more than 112 thousand square kilometers.
(Hint: Google is right)
This is a problem for your business and for your SEO. Accuracy is an important part of EEAT. It’s especially critical for “your money or your life” (YMYL) content, like financial or medical advice. In these cases, the content you publish can and does impact real people’s lives and livelihoods.
Spotty accuracy has even prompted some sites, like StackOverflow, to ban AI-generated content.
3. You don’t have the rights to your AI-generated content.
AI-generated content isn’t actually copyrightable. Yes, you read that right.
As it stands, the courts have interpreted the Copyright Act to mean that only human-authored works can be copyrighted. Something is only legally defensible when it involves at least a minimal amount of creativity.
We’re all familiar with this concept when it comes to books, TV shows, movies, and paintings, but it matters for your website, too. You want your content and your ideas to be yours. If you use AI-generated content, be aware that it isn’t subject to standard intellectual property rules and may not be protected.
4. AI-generated content can’t capture your voice.
Even if you fly under Google’s radar with your AI content, it still won’t really feel like you. You are the only you. We know that sounds like it belongs on an inspirational poster, but it’s true. Your voice is what readers will connect with, believe in, and ultimately trust.
Sure, AI may succeed at stringing together facts and keywords to create content that ranks. And that content may even drive people to your site. But it lacks the emotional intelligence to infuse your content with real-life examples and anecdotes that make readers more likely to read, share, and engage with your content and your brand.
Your voice is also what sets you apart from other brands in your industry. Without that, why would a customer choose you?
AI and SEO Is a Journey, Not a Destination
AI is not the end of human-driven SEO. In reality, AI has only just arrived. But the real opportunity lies in finding out how AI can enhance, not replace, our work to create winning SEO content.
Think about content translation. Hand translation is the most premium translation option out there. It’s also costly. While machine translation on its own can be a bit of a mess, many translation companies actually start with an automated solution, then bring in the humans to polish that first translation into a final product. If you ask us, AI and SEO will work in much the same way.
Even in a post-AI world, SEO all comes down to this guidance from Google:
“If it is useful, helpful, original, and satisfies aspects of E-E-A-T, it might do well in Search. If it doesn’t, it might not.”
If and when you do decide to leverage AI, keep these tips in mind:
- Use AI to generate ideas, not create finished products. Asking ChatGPT to provide five industry trends that you turn into a series of articles is one thing; cutting and pasting a full AI-generated article onto your website is another.
- Fact-check anything and everything AI tells you. + Infuse your brand into every piece of AI-generated copy. Personal stories, insights, and anecdotes are what makes great content great.
At Oomph, we believe quality branded content is just one component of a digital experience that engages and inspires your audience.
Need help integrating SEO content into your company’s website? Let’s talk.
Among enterprise-scale organizations, from healthcare to government to higher education, we’ve seen many content owners longing for a faster, easier way to manage content-rich websites. While consumer-level content platforms like Squarespace or Wix make it easy to assemble web pages in minutes, most enterprise-level platforms prioritize content governance, stability, and security over ease of use.
Which is a nice way of saying, sometimes building a new page is as much fun as getting a root canal.
That’s why we’re excited about Site Studio, a robust page-building tool from our partners at Acquia. Site Studio makes content editing on Drupal websites faster and more cost-effective, while making it easy for non-technical users to create beautiful, brand-compliant content.
In this article, we’ll explain what Site Studio is, why you might want it for your next Drupal project, and a few cautions to consider.
What is Site Studio?
Formerly known as Cohesion, Site Studio is a low-code visual site builder for Drupal that makes it easy to create rich, component-based pages without writing code in PHP, HTML, or CSS. Essentially, it’s a more feature-rich alternative to Drupal’s native design tool, Layout Builder.
How does Site Studio work? Site developers lay the groundwork by building a component library and reusable templates with brand-approved design elements, such as hero banners, article cards, photo grids, buttons, layouts, and more. They can either create custom components or customize existing components from a built-in UI kit.
Content editors, marketers, and other non-technical folks can then create content directly in the front end of the website, using a drag-and-drop visual page builder with a full WYSIWYG interface and real-time previews.
Who is Site Studio For?
In our experience, the businesses that benefit most from a powerful tool like Site Studio tend to be enterprise-level organizations with content-rich websites — especially those that own multiple sites, like colleges and universities.
Within those organizations, there are a number of roles that can leverage this tool:
Content owners
With Site Studio, marketers and content editors can browse to any web page they want to update, and edit both the content and settings directly on the page. Rewriting a header, swapping an image with a text box, or rearranging a layout can be done in just seconds.
Site builders
Using Drupal’s site configuration interfaces and Site Studio’s theming tools, site builders can easily create Drupal websites end-to-end, establishing everything from the information architecture to the content editing experience.
Brand managers
Managers can define site wide elements, like headers and footers or page templates, to ensure that an organization’s branding and design preferences are carried out. They can also create sub-brand versions of websites that have unique styles alongside consistent brand elements.
IT and web teams
By putting content creation and updates in the hands of content authors, Site Studio frees up developers to work on more critical projects. In addition, new developers don’t need to have expert-level Drupal theming experience, because Site Studio takes care of the heavy lifting.
What Can You Do With Site Studio?
Site Studio makes it easy to create and manage web content with impressive flexibility, giving content owners greater control over their websites without risking quality or functionality. Here’s how.
Go to market faster.
Site Studio’s low-code nature and library of reusable components (the building blocks of a website) speeds up both site development and content creation. Creators can quickly assemble content-rich pages, while developers can easily synchronize brand styles, components, and templates.
Site Studio provides a UI Kit with around 50 predefined components, like Text, Image, Slider, Accordion, etc… Developers can also build custom components. Change any component in the library, and all instances of that component will update automatically. You can also save layout compositions as reusable ”helpers” to streamline page creation.
Build beautiful pages easily.
While we love the power and versatility of Drupal, its page building function has never been as user-friendly as, say, WordPress. Site Studio’s Visual Page Builder brings the ease of consumer-level platforms to the enterprise website world.
This intuitive, drag-and-drop interface lets users add or rewrite text, update layouts, and change fonts, styles, colors, or images without any technical help. And, it’s easy to create new pages using components or page templates from the asset library.
Ensure brand consistency.
With Site Studio, you can define standards for visual styles and UI elements at the component level. This provides guardrails for both front-end developers and content creators, who draw on the component library to build new pages. In addition, Site Studio’s import and sync capabilities make it easy to enforce brand consistency across multiple sites.
Get the best out of Drupal.
Because Site Studio is designed exclusively for Drupal, it supports many of Drupal’s core features. With Site Studio’s component library, for instance, you can create templates for core content types in Drupal. Site Studio also supports a number of contributed content modules (created by Drupal’s open-source community), so developers can add additional features that are compatible with Site Studio’s interface.
What Are Some Limitations of Using Site Studio?
There’s no doubt Site Studio makes life easier for everyone from marketers to web teams. But there are a few things to consider, in terms of resource costs and potential risks.
Start from the ground up.
To ensure the best experience, Site Studio should be involved in almost all areas of your website. Unlike other contributed modules, it’s not a simple add-on — plan on it being the core of your Drupal site’s architecture.
This will let you make decisions based on how Site Studio prefers a feature to be implemented, rather than bending Drupal to fit your needs (as is often the case). Staying within Site Studio’s guardrails will make development easier and faster.
Be careful with custom components.
With its recent Custom Components feature, Site Studio does let developers create components using their preferred code instead of its low-code tools. So, you can create a level of custom functionality, but you must work within Site Studio’s architecture (and add development time and cost).
If you decide instead that for a given content type, you’re going to sidestep Site Studio and build something custom, you’ll lose access to all its components and templates — not to mention having to manage content in different systems, and pay for the custom development.
Rolling back changes is tough.
A standard Drupal site has two underlying building blocks: database and code. Drupal uses the code (written by developers) to carry out functions with the database.
When a developer changes, say, the HTML code for a blog title, the change happens in the code, not the database. If that change happened to break the page style, you could roll back the change by reverting to the previous code. In addition, most developers test changes first in a sandbox-type environment before deploying them to the live website.
By contrast, with Site Studio, most changes happen exclusively in the database and are deployed via configuration. This presents a few areas of caution:
- Users with the correct permissions can override configuration on a live site, which could impact site functionality.
- Database changes can have far-reaching impacts. If you have to roll back the database to fix a problem, you’ll lose any content changes that were made since the last backup.
That’s why Site Studio requires meticulous QA and careful user permissioning to prevent inadvertent changes that affect site functionality.
One Last Thing: You Still Need Developers
While it’s true that just about anyone in your organization can create pages with Site Studio’s intuitive interface, there are still aspects of building and maintaining a Drupal website that require a developer. Those steps include:
- Setup and implementation of Site Studio,
- Building reusable components and templates, and
- Back-end maintenance (like updates, compliance, and security).
However, once the components have been built, it’s easy for non-technical content owners to create beautiful pages. In the end, you’ll be able to launch websites and pages faster — with the creativity and consistent identity your brand deserves.
Interested in learning whether Site Studio is a good fit for your Drupal website? Contact us for more info.
There’s a phrase often used to gauge healthcare quality: the right care, at the right time, in the right place. When those elements are out of sync, the patient experience can take a turn for the worse. Think about missed appointments, misunderstood pre-op instructions, mismanagement of medication… all issues that require clear and timely communication to ensure positive outcomes.
Many healthcare organizations are tapping into patient engagement tools that use artificial intelligence (AI) to drive better healthcare experiences. In this article, we’ll cover a number of use cases for AI within healthcare, showing how it can benefit providers, their patients, and their staff in an increasingly digital world.
Healthcare Consumers are Going Digital
Use of AI in the clinical space has been growing for years, from Google’s AI aiding diagnostic screenings to IBM’s Watson AI informing clinical decision making. But there are many other touchpoints along a patient’s continuum of care that can impact patient outcomes.
The industry is seeing a shift towards more personalized and data-driven patient engagement, with recent studies showing that patients are ready to integrate AI and other digital tools into their healthcare experiences.
For instance, healthcare consumers are increasingly comfortable with doctors using AI to make better decisions about their care. They also want personalized engagement to motivate them on their health journey, with 65% of patients agreeing that communication from providers makes them want to do more to improve their health.
At the same time, 80% of consumers prefer to use digital channels (online messaging, virtual appointments, text, etc…) to communicate with healthcare providers at least some of the time. This points to significant opportunities for digital tools to help providers and patients manage the healthcare experience.
Filling in Gaps: AI Use Cases for Healthcare
Healthcare will always need skilled, highly trained experts to deliver high quality care. But, AI can fill in some gaps by addressing staffing shortages, easing workflows, and improving communication. Many healthcare executives also believe AI can provide a full return on investment in less than three years.
Here are some ways AI can support healthcare consumers and providers to improve patients’ outcomes and experiences.
Streamline basic communications
Using AI as the first line to a patient for basic information enables convenient, personalized service without tying up staff resources. With tools like text-based messaging, chatbots, and automated tasks, providers can communicate with people on the devices, and at the times, that they prefer.
Examples include:
- Scheduling appointments
- Sending appointment reminders
- Answering insurance questions
- Following up on a speciality referral
Remove barriers to access
AI algorithms are being used in some settings to conduct initial interviews that help patients determine whether they need to see a live, medical professional — and then send them to the right provider.
AI can offer a bridge for patients who, for a host of reasons, are stuck in taking the first step. For instance, having the first touchpoint as a chatbot helps overcome a barrier for patients seeking care within often-stigmatized specialities, such as behavioral health. It can also minimize time wasted at the point of care communicating things like address changes and insurance providers.
Reduce no-show rates
In the U.S., patient no-show rates range from 5.5 to 50%, depending on the location and type of practice. Missed appointments not only result in lost revenue and operational inefficiencies for health systems, they can also delay preventive care, increase readmissions, and harm long-term outcomes for patients.
AI-driven communications help ensure that patients receive critical reminders at optimal times, mitigating these risks. For instance:
- Text-based procedure prep. Automated, time-specific reminders sent to patients prior to a procedure can ensure they correctly follow instructions — and remember to show up
- Post-procedure support. Chatbots can deliver post-op care instructions or follow-up visit reminders, with a phone number to call if things don’t improve
Close information gaps
Imagine a patient at home, alone, not feeling well, and confused about how to take their medication or how to handle post-operative care. Not having that critical information can lead to poor outcomes, including readmission.
Delivering information at the right time, in the right place, is key. But multiple issues can arise, such as:
- A patient needs help outside normal business hours
- Different care team members provide conflicting instructions
- An understaffed care team is unable to return a patient’s call in a timely manner
By providing consistent, accurate, and timely information, AI-enabled tools can provide critical support for patients and care teams.
Minimize staff burnout
Burnout and low morale have contributed to severe staffing shortages in the US healthcare system. The result is an increase in negative patient outcomes, in addition to massive hikes in labor costs for hospitals and health systems.
AI can help lighten the burden on healthcare employees through automated touchpoints in the patient journey, such as self-scheduling platforms or FAQ-answering chatbots. AI can even perform triage informed by machine learning, helping streamline the intake process and getting patients the right care as quickly as possible.
This frees up staff to focus on more meaningful downstream conversations between patients and care teams. It can also reduce phone center wait times for those patients (often seniors) who still rely on phone calls with live staff members.
Maximize staff resources
When 80% of healthcare consumers are willing to switch providers for convenience factors alone, it’s crucial to communicate with patients through their preferred channels. Some people respond to asynchronous requests (such as scheduling confirmations) late at night, while others must speak to a live staff member during the day.
Using multimodal communication channels (phone, text, email, web) offers two major benefits for healthcare providers. For one, you can better engage patients who prefer asynchronous communication. You can also identify the ratio of patients who prefer live calls and staff accordingly when it’s needed most.
Leverage customer feedback
AI provides fast, seamless avenues to gather and track patient satisfaction data and create a reliable, continual customer feedback loop. Tools like chatbots and text messaging expand the number of ways patients can communicate with healthcare providers, making it easier to leave feedback and driving not only a better digital customer experience but potentially leading to better satisfaction scores that may impact payment or quality scores.
AI offers another benefit, too: the ability to identify and respond more quickly to negative feedback. The more swiftly a problem is resolved, the better the consumer experience.
A Few Tips for Getting Started
First, find a trusted technology partner who has experience with healthcare IT stacks and understands how AI fits into the landscape. The healthcare industry is distinctly different from other verticals that might use tools like chatbots and automated tasks. You need a partner who’s familiar with the nuances of the healthcare consumer experience and regulatory compliance requirements.
Next, start small. It’s best to choose your first AI applications in a strategic, coordinated manner. One approach is to identify the biggest bottlenecks for care teams and/or patients, then assess which areas present the lowest risk to the customer experience and the greatest chance of operational success.
Finally, track the progress of your first implementation. Evaluate, iterate, evaluate again, and then expand into other areas when you’re comfortable with the results.
Focal points for iteration:
- Standardize and optimize scripts
- Simplify processes for both patients and staff
- Learn the pathways that users take to accomplish tasks
- Monitor feedback and make improvements as needed
Above all, remember that successful use of AI isn’t just about how well you implement the technology. It’s about the impact those digital tools have on improving patient outcomes and increasing patient satisfaction with their healthcare experience.
Interested in exploring the specific ways AI can benefit your care team and patients? We’re here to help! Contact us today.
The circular economy aims to help the environment by reducing waste, mainly by keeping goods and services in circulation for as long as possible. Unlike the traditional linear economy, in which things are produced, consumed, and then discarded, a circular economy ensures that resources are shared, repaired, reused, and recycled, over and over.
What does this have to do with your digital platform? In a nutshell: everything.
From tackling climate change to creating more resilient markets, the circular economy is a systems-level solution for global environmental and economic issues. By building digital platforms for the circular economy, your business will be better prepared for whatever the future brings.
The Circular Economy isn’t Coming. It’s Here.
With environmental challenges growing day by day, businesses all over the world are going circular. Here are a few examples:
- Target plans for 100% of its branded products to last longer, be easier to repair or recycle, and be made from materials that are regenerative, recyclable, or sustainably sourced.
- Trove’s ecommerce platform lets companies buy back and resell their own products. This extends each products’ use cycle, lowering the environmental and social cost per item.
- Renault is increasing the life of its vehicle parts by restoring old engine parts. This limits waste, prolongs the life of older cars, and reduces emissions from manufacturing.
One area where nearly every business could adopt a circular model is the creation and use of digital platforms. The process of building websites and apps, along with their use over time, consumes precious resources (both people and energy). That’s why Oomph joined 1% For the Planet earlier this year. Our membership reflects our commitment to do more collective good — and to hold ourselves accountable for our collective impact on the environment.
But, we’re not just donating profits to environmental causes. We’re helping companies build sustainable digital platforms for the circular economy.
Curious about your platform’s environmental impact? Enter your URL into this tool to get an estimate of your digital platform’s carbon footprint.
Changing Your Platform From Linear to Circular
If protecting the environment and promoting sustainability is a priority for your business, it’s time to change the way you build and operate your websites and apps. Here’s what switching to a platform for the circular economy could look like.
From a linear mindset…
When building new sites or apps, many companies fail to focus on longevity or performance. Within just a few years, their platforms become obsolete, either as a result of business changes or a desire to keep up with rapidly evolving technologies.
So, every few years, they have to start all over again — with all the associated resource costs of building a new platform and migrating content from the old one.
Platforms that aren’t built with performance in mind tend to waste a ton of energy (and money) in their daily operation. As these platforms grow in complexity and slow down in performance, one unfortunate solution is to just increase computing power. That means you need new hardware to power the computing cycles, which leads to more e-waste, more mining for metals and more pollution from manufacturing, and more electricity to power the entire supply chain.
Enter the circular economy.
…to a circular approach.
Building a platform for the circular economy is about reducing harmful impacts and wasteful resource use, and increasing the longevity of systems and components. There are three main areas you can address:
1. Design out waste and pollution from the start.
At Oomph, we begin every project with a thorough and thoughtful discovery process that gets to the heart of what we’re building, and why. By identifying what your business truly needs in a platform — today and potentially tomorrow — you’ll minimize the need to rebuild again later.
It’s also crucial to build efficiencies into your backend code. Clean, efficient code makes things load faster and run more quickly, with fewer energy cycles required per output.
Look for existing frameworks, tools, and third-party services that provide the functions you need and will continue to stay in service for years or decades to come. And, instead of building a monolith platform that has to be upgraded every few years or requires massive computing power, consider switching to a more nimble and efficient microservices architecture.
2. Keep products and services in use.
Regular maintenance and timely patching is key to prolonging the life of your platform. So is proactively looking for performance issues. Be sure to regularly test and assess your platform’s speed and efficiency, so you can address problems early on.
While we’re advocating for using products and services for as long as possible, if your platform is built on microservices, don’t be afraid to replace an existing service with a new one. Just make sure the new service provides a benefit that outweighs the resource costs of implementing it.
3. Aim to regenerate natural systems.
The term “regenerate” describes a process that mimics the cycles of nature by restoring or renewing sources of energy and materials. It might seem like the natural world is far removed from your in-house tech, but there are a number of ways that your IT choices impact the environment.
For starters, you can factor sustainability into your decisions around vendors and equipment. Look for digital hosting companies and data centers that are green or LEED-certified. Power your hardware with renewable energy sources. Ultimately, the goal is to consider not just how to reduce your platform’s impact on the environment, but how you can create a net-positive effect by doing better with less.
Get Ready for the Future
We’ve long seen that the ways in which businesses and societies use resources can transform local and global communities. And we know that environmental quality is inextricably linked to human wellbeing and prosperity. The circular economy, then, provides a way to improve our future readiness.
Companies that invest in sustainability generally experience better resilience, improved operational performance, and longer-lasting growth. They’re also better suited to meet the new business landscape, as governments incentivize sustainable activities, customers prefer sustainable products, and employees demand sustainable leadership.
Interested in exploring how you can join the new circular economy with your digital platforms? We’d love to help you explore your options, just contact us.
In our previous post we broadly discussed the mindset of composable business. While “composable” can be a long term company-wide strategy for the future, companies shouldn’t overlook smaller-scale opportunities that exist at every level to introduce more flexibility, longevity, and reduce costs of technology investments.
For maximum ROI, think big, then start small
Many organizations are daunted by the concept of shifting a legacy application or monolith to a microservices architecture. This is exacerbated when an application is nearing end of life.
Don’t discount the fact that a move to a microservices architecture can be done progressively over time, unlike the replatform of a monolith which is a huge investment in both time and money that may not be realized for years until the new application is ready to deploy.
A progressive approach allows organizations to:
- Move faster and allow for adjustments as needed
- Begin realizing returns on investments faster
- Reduce risk by making smaller investments and deployments
- Ease budgeting process by funding an overhaul in stages
- Improve quality by minimizing the scope of tests
- Save money on initial investment and maintenance where services are centralized
- Benefit from longevity of a component-based system
Prioritizing the approach by aligning technical architecture with business objectives
As with any application development initiative, aligning business objectives with technology decisions is essential. Unlike replatforming a monolith, however, prioritizing and planning the order of development and deployments is crucial to the success of the initiative.
Start with clearly defining your application with a requirements and feature matrix. Then evaluate each using three lenses to see priorities begin to emerge:
- With a current state lens, evaluate each item. Is it broken? Is it costly to maintain? Is it leveraged by multiple business units or external applications?
- Then with a future state lens, evaluate each item. Could it be significantly improved? Could it be leveraged by other business units? Could it be leveraged outside the organization (partners, etc…)? Could it be leveraged in other applications, devices, or locations?
- Lastly, evaluate the emerging priority items with a cost and effort lense. What is the level of effort to develop the feature as a service? What is the likely duration of the effort?
Key considerations when planning a progressive approach
Planning is critical to any successful application development initiative, and architecting a microservices based architecture is no different. Be sure to consider the following key items as part of your planning exercises:
- Remember that rearchitecting a monolith feature as a service can open the door to new opportunities and new ways of thinking. It is helpful to ask “If this feature was a stand alone service, we could __”
- Be careful of designing services that are too big in scope. Work diligently to break down the application into the smallest possible parts, even if it is later determined that some should be grouped together
- Keep security front of mind. Where a monolith may have allowed for a straightforward security management policy with everything under one roof, a services architecture provides the opportunity for a more customized security policy, and the need to define how separate services are allowed to communicate with each other and the outside world
In summary
A microservices architecture is an approach that can help organizations move faster, be more flexible and agile, and reduce costs on development and maintenance of software applications. By taking a progressive approach when architecting a monolith application, businesses can move quickly, reduce risk, improve quality, and reduce costs.
If you’re interested in introducing composability to your organization, we’d love to help! Contact us today to talk about your options.
THE BRIEF
Three Organizations Working Towards One Goal
The American Foundation for Suicide Prevention (AFSP), the National Action Alliance for Suicide Prevention (Action Alliance), and the Suicide Prevention Resource Center (SPRC) have been commissioning The Harris Poll to conduct a bi-annual, nationally representative survey of adults in the U.S. to understand the public’s beliefs and attitudes about mental health and suicide.


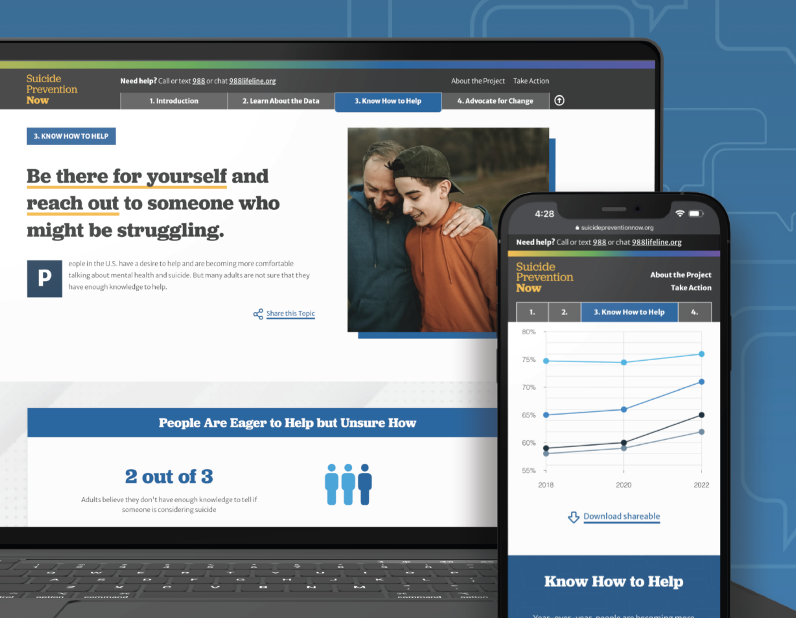
This year, 2022, all three suicide prevention organizations teamed up with Oomph to take that data and distill it into a microsite for easy consumption among professionals and the general public who visit the site.
The data from the poll shows that progress has been made, but there is still more to do. We all must continue to learn more about suicide and mental health, particularly through increased research efforts, teaching everyone how to help prevent suicide and strengthen mental health, and advocate for improved access to care and robust crisis services.
Oomph made sure our approach to information design, branding, and messaging came across effectively and clearly. How could we use data to show people which actions they could personally take to affect positive change?
THE APPROACH
Design Sprint to E-Learning Microsite
Our initial idea of the audience was more public facing rather than a specific audience. We started our design approach to be stylized and playful.
Taking a step back, we regrouped and determined that the audience was more academic and administrative, therefore it was to lean towards a professional tone. A new idea clicked — we could present this microsite as an e-learning experience.

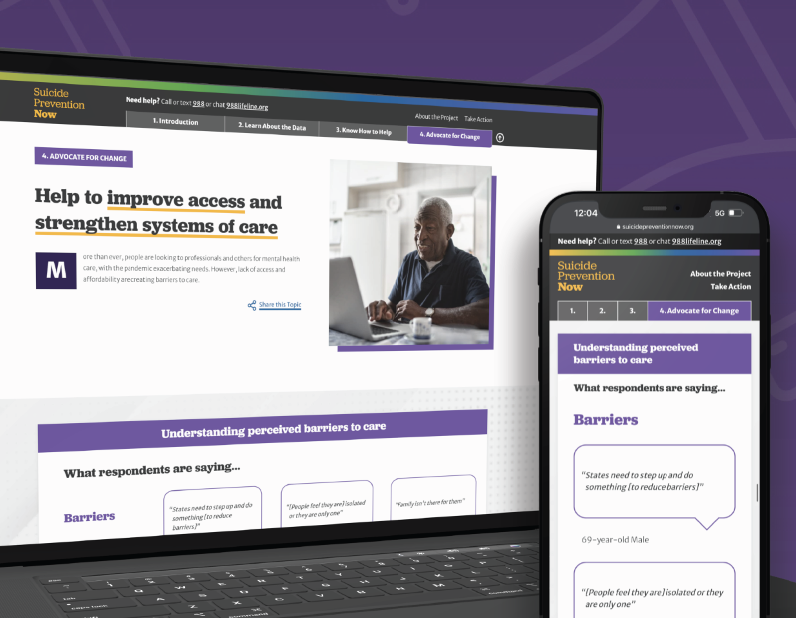
The new design direction features four key chapters: the Introduction, Learn About the Data, Know How to Help, and Advocate for Change. By implementing a tab-like navigation, it allows for users to hop to each section they may be most interested in, and reads as if it is an eBook.
Each section is color coded, and the navigation has a gradient that brings in all of the sections together in unity to showcase that message throughout. Each section follows a similar pattern: an introduction, data from the Harris Poll, an opportunity to find resources about the chapter, and shareable resources to help spread the message on the viewer’s own social channels. We hope that by the end of the microsite, the user is ready to inform themselves further by finding resources or sharing about the current perceptions of suicide.
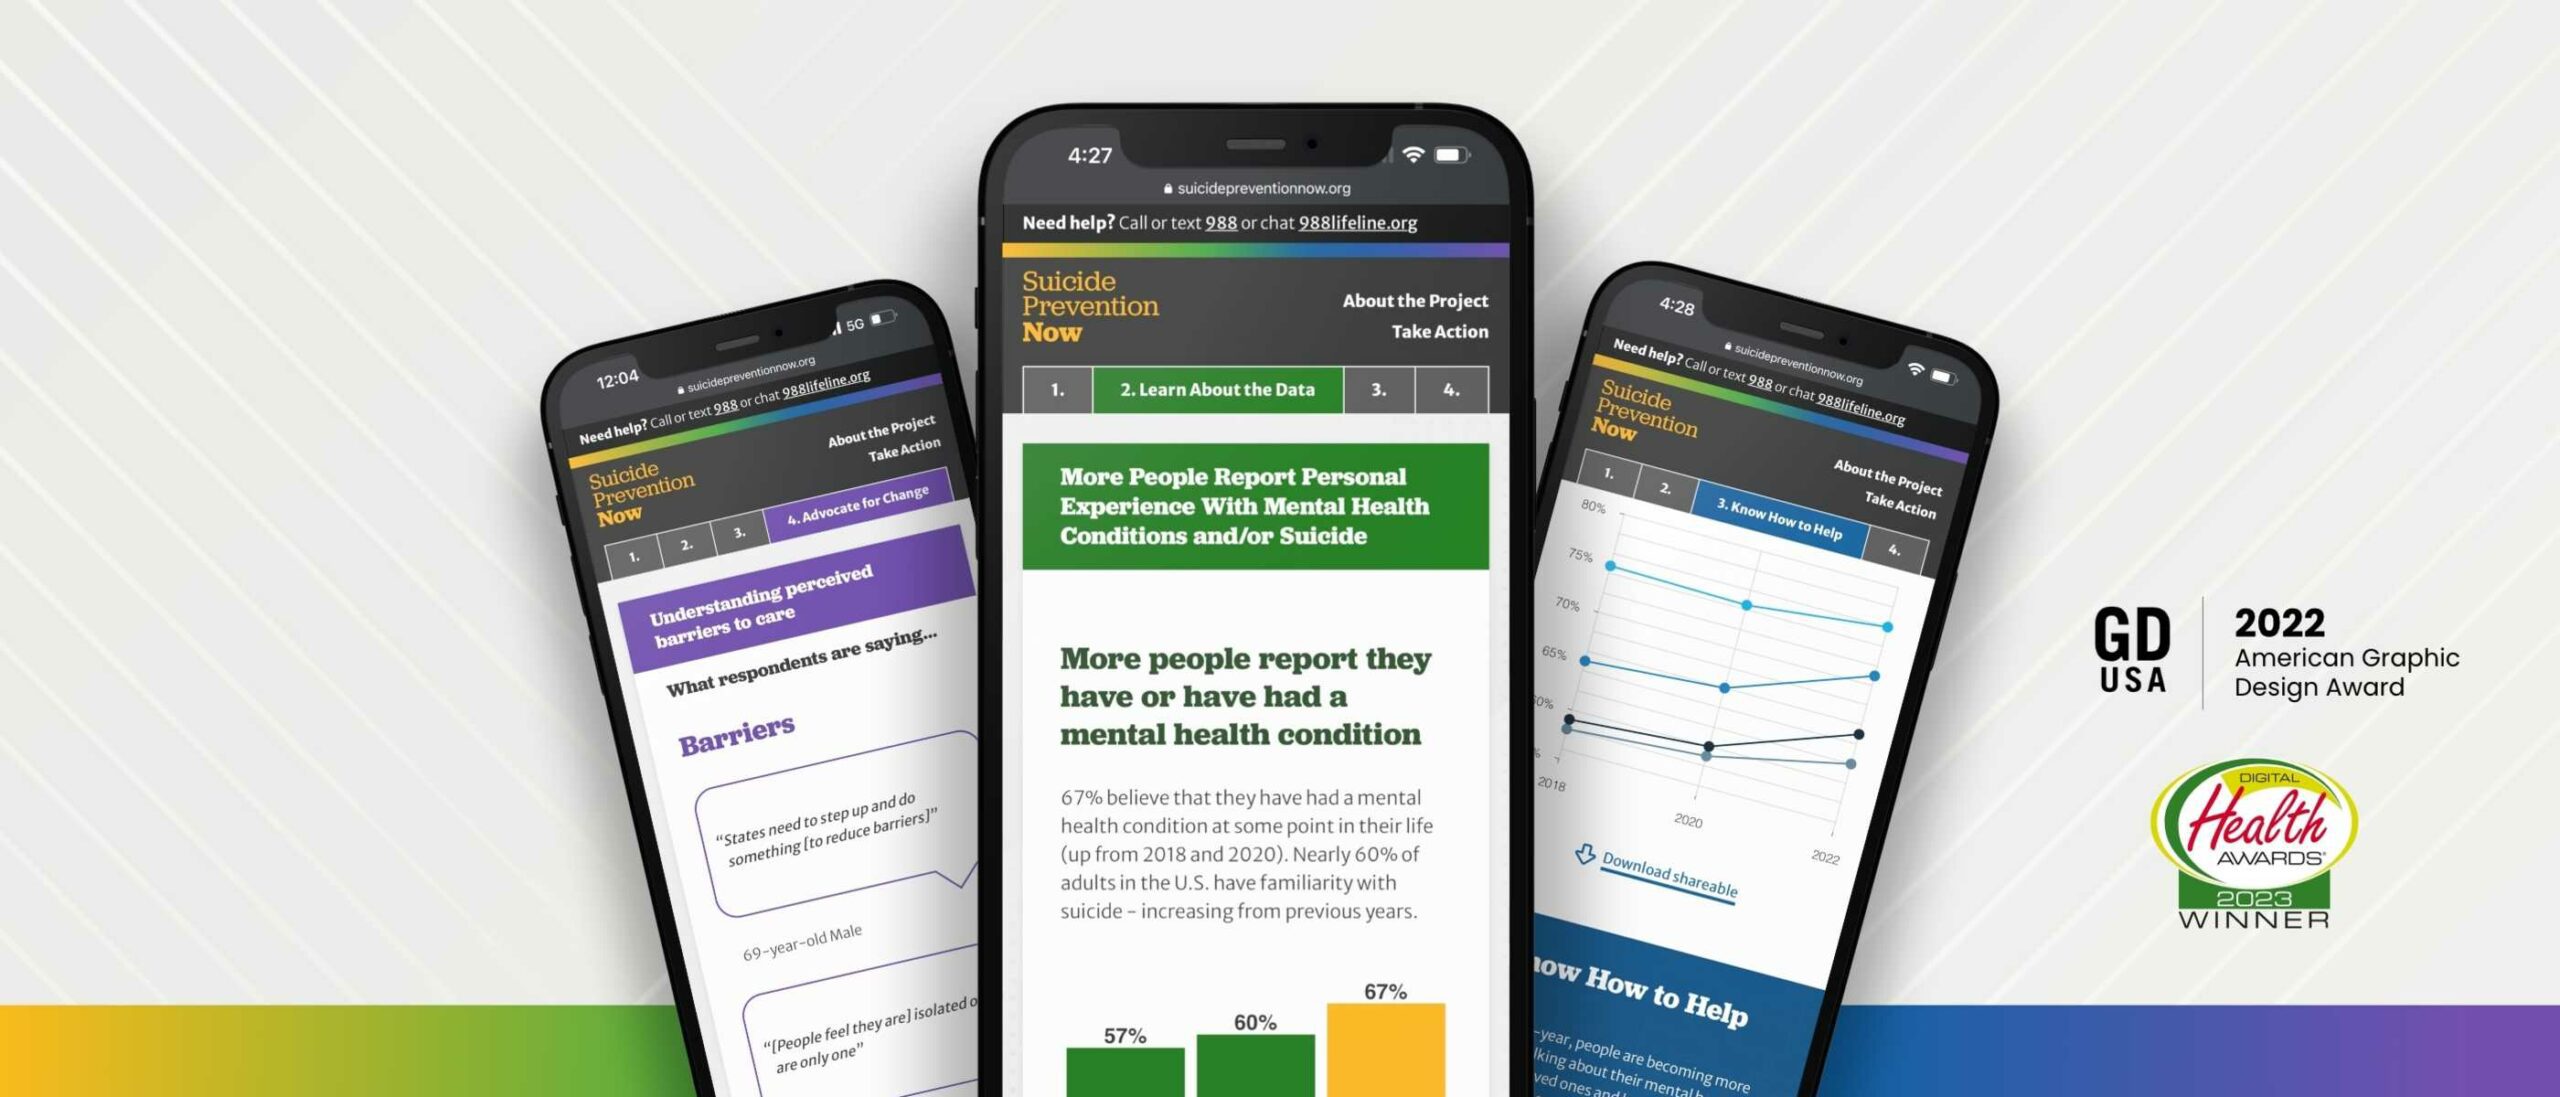
THE RESULTS
Ongoing Public-education Impact
While Suicide Prevention Now is just one step of many, we hope that this project will help more people to become an advocate, or help spread awareness about suicide prevention. We hope it helps to save lives.
While working on this project, we became aware of a national suicide hotline number that is quick to dial and easy to remember, just like 911. Dial 988 to be connected to a friendly and helpful advocate if you or someone you know are having thoughts of suicide.
Working with Oomph was a great experience all the way around. From exploration to delivery, Oomph provided excellent guidance, and the quality of the final site is fantastic! I look forward to working with the team again in the future.
JONATHAN DOZIER-EZELL Director of Digital Communications,
American Foundation for Suicide Prevention
Digital customer experience (DCX) is fast becoming a key factor in how consumers choose whom to do business with. Every digital interaction contributes to an overall feeling about your brand — which means digital touchpoints like apps and chatbots can play a big part in what customers think of your company.
What story do you want those interactions to tell? What kind of experiences do you want people to share with others?
This article covers five ways to assess and improve your digital customer experience so you can attract, delight, and retain your target customers.
But First – What IS Digital Customer Experience?
Customer experience, or CX, is the perception that customers form based on all of their interactions, in-person or online, with your brand. If CX is about carefully and consistently meeting your customers’ needs, Digital Customer Experience is the online expression of those efforts.
Digital customer experience is the part of your CX journey that involves digital interactions via your website, mobile app, social media accounts, digital kiosks, etc. Wherever your customers are engaging with your people, products, or services through the internet, it’s a digital experience.
DCX is their perception of those moments.
Brands with a great DCX provide a personalized and consistent online experience throughout the customer journey. Whether someone is considering becoming a client, placing an order, or searching for information, every digital interaction has to be easy and enjoyable.
5 Ways to Improve Your Digital Customer Experience
Technology is a wonderful tool for improving the customer experience, whether mining data for customer insights or leveraging AI for personalization. But technology alone can’t deliver an exceptional digital customer experience. Your DCX strategy must include a human component — one that focuses on customer care through empathy and authenticity. Here’s how to ensure your digital customer experience lives up to your users’ expectations.
Know your target audience
To deliver the kind of digital experience your customers will love, you have to know what they want. Who’s buying your product, and why? When they visit your website or app, what are they hoping to accomplish?
Delighting your customers requires knowing their goals, understanding their pain points, and providing interactions that meet their specific needs. The upshot? 68% of customers will spend more money with a brand that understands and treats them like an individual.
Here are three crucial steps:
- Use qualitative and quantitative analyses to learn about your audience. The more you understand their preferences and behaviors, the better you can create an experience that meets their needs.
- Apply a user-centered design process, which relies on deeply understanding your audience to craft usable, accessible digital interfaces.
- Incorporate personalization techniques to adapt the digital experience for individual users. More than anything else, this will help make the customer journey smooth and enjoyable.
Adopt an omnichannel mindset
Customers expect seamless interactions from brands throughout their journey, whether through digital or non-digital channels. In fact, brands with the strongest omnichannel customer engagement strategies retain an average of 89% of their customers, in comparison to 33% of companies with weak strategies.
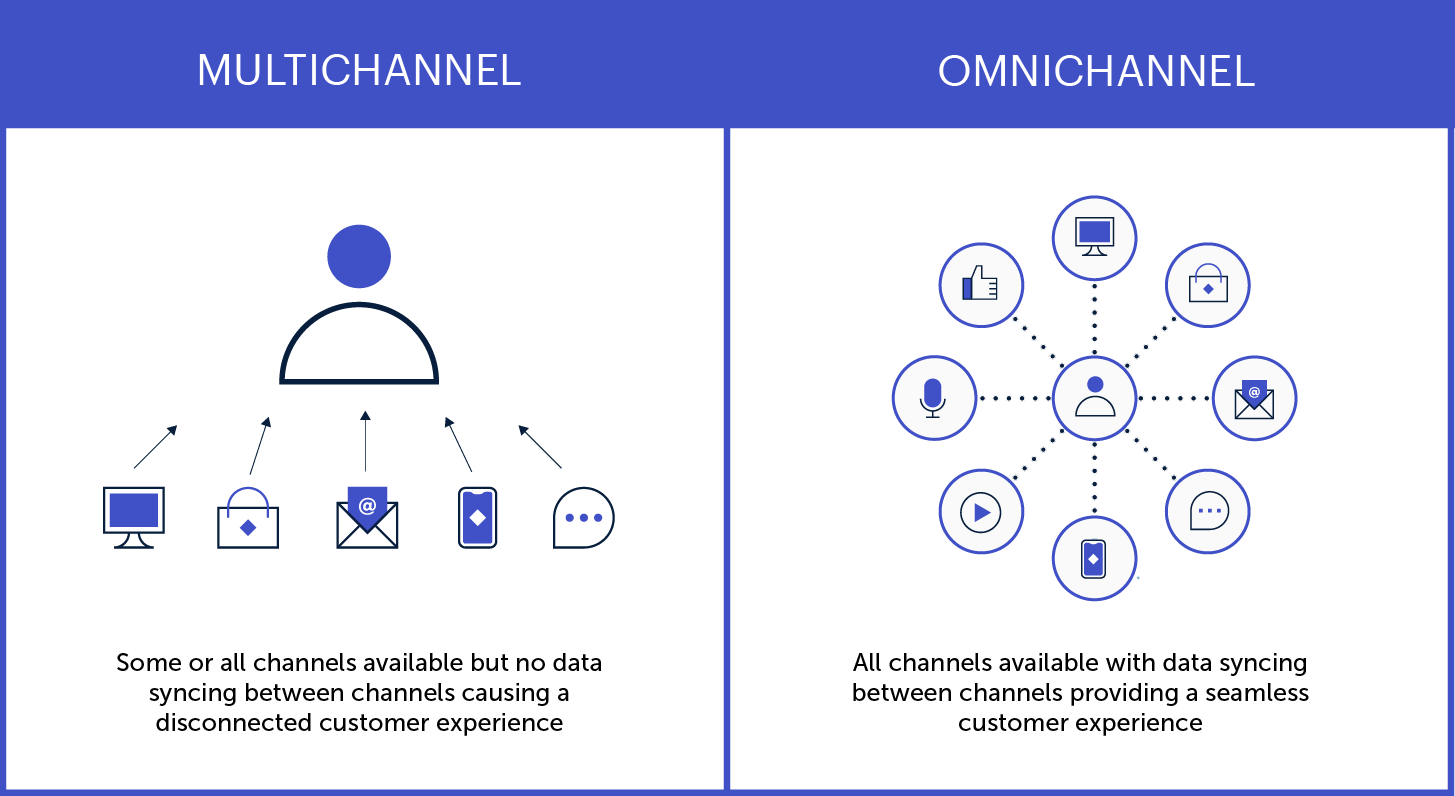
Knowing that today’s consumers often jump from channel to channel as they browse, buy, or get in touch, DCX leaders embrace an omnichannel strategy. Note that this is different from a multichannel approach, where customers access multiple channels in separate interactions. An omnichannel approach integrates all digital touchpoints to create a seamless, personalized experience.
Here are a few key ways to create personalized experiences that resonate across all your digital channels:
- Use instantly recognizable brand elements and visual designs
- Make the transition from one channel to another easier
- Save search history and preferences across devices
- Synchronize ads and other promotional content
Get help from experts
Expert assessments can remove the guesswork around optimizing your digital customer experience. A digital CX audit, for instance, will show you what’s working and what could be better, as well as providing actionable insights and a prioritized roadmap.
CX specialists will look beyond the basic digital experience (clunky design, system bugs, etc…) to assess whether your digital channels are effectively serving your customers’ needs. A professional audit can help determine things like:
- Are there critical issues affecting usability and access?
- What elements of the journey most impact users’ experience?
- What are your competitors doing, and how can you differentiate?
- Where are your greatest strengths and growth opportunities?
Make customer feedback easy
Most companies know that customer feedback is crucial for improving the customer experience. But many fall short in providing easy, effective options for people to reach them.
Offering multiple, easy-to-use communication options across your digital channels is one more way to delight your customers. Help people engage with you via the medium of their choice, so they can communicate through the interface they’re most comfortable with.
That could be a chat function or contact form on your website, or the commenting and messaging features on your social profiles. Or, maybe it’s good old-fashioned phone calls and emails. Whatever the avenue, make it easy to find and intuitive to use.
One more thing: when someone does reach out, respond quickly. The faster a problem is resolved, the better the experience.
Plan for the post-launch reality
You might design and launch an amazing new website, app, or service that delights your customers and sends revenue through the roof. But, without a long-term plan to keep it effective and relevant, your digital CX will likely diminish over time.
To maintain the quality of customer experience across all your digital touchpoints, apply a measurement framework based on the principles above:
- Are you meeting users’ current and evolving needs?
- Do you provide a seamless omnichannel experience?
- Are you gathering — and implementing — user feedback?
Remember, too, that new technological trends are going to keep emerging and influencing consumer expectations. Be prepared to evolve what digital CX looks like for your business, especially if it means extending your digital services to new platforms or devices.
Putting the “C” in Digital CX
Technology has made so many things possible for today’s consumers that, ultimately, the power is in their hands. As digital capabilities continue to evolve, people may become increasingly selective about which brands earn their trust and business — and companies will need to make the digital customer experience more beneficial for both sides.
As you can see from the steps above, the key is putting your customers’ needs above all else.
If you’re not sure where to start, you’re not alone! We’ve helped dozens of clients dive into customer research, omnichannel strategies, and strategic planning for digital platforms. Reaching out to a digital CX expert (like Oomph) can help you do things right the first time, saving you time and money and, most importantly, building a foundation to get results.
Excited about crafting an exceptional DCX? So are we. Check out our DCX audit service to learn how we can help set you up for success.
“Inclusive design” may sound like vague, trendy, technical jargon. But inclusive design isn’t a trend — it’s the world catching up on the kind of digital experiences that should have been part of the web from the beginning.
Inclusive design is a crucial part of nearly every digital platform, be it website, app, or intranet.
Inclusive design as a concept and practice is broad and deep — this article barely scratches the surface, but will help you understand the mindset required. We’ll cover what it is, why it matters for your business, and some ways to assess whether your digital platform could be more inclusive.
- What does “inclusive design” mean?
- What are the benefits of inclusive design?
- How are inclusive design and accessibility different?
- How can you make your platform more inclusive?
What does “inclusive design” mean?
The Inclusive Design Research Center defines inclusive design as “design that considers the full range of human diversity with respect to ability, language, culture, gender, age and other forms of human difference.” Adding to that, Nielsen Norman calls it creating products that “understand and enable people of all backgrounds and abilities,” including economic situation, geography, race, and more.
Essentially, you’re aspiring to create interfaces that reflect how people from all walks of life interact with the world.
Inclusive design allows people to use a digital platform with ease, whatever their needs or point of view. Looking at characteristics like race, abilities, or geography helps us identify key areas where friction can occur between humans and the web.
In the end, it’s about designing for everyone.
What are the benefits of inclusive design?
Inclusive design isn’t just about recognizing and accommodating diversity; it also creates business advantages for organizations that are willing to invest in an inclusive approach. Here are a few key areas where inclusive design can give your digital platform an edge:
Grow your customer base. By understanding the best way to connect with a wider target audience, your team can create digital experiences that attract the most possible users.
Increase user engagement. Engagement goes up when platforms are welcoming and easy to use. Inclusive web design removes barriers and creates motivation for people to engage with your brand.
Spark innovation. Inclusive solutions have a history of spawning innovation that goes beyond the initial intended audience (think closed-captioning-turned-subtitles on Netflix). Sometimes, when you aim to solve a specific usability issue, you end up creating an entirely new market solution.
Motivate your team. The way a digital platform is designed affects all audiences, even employees. Designing with inclusivity in mind can also have a positive influence on your own team. Engaging employees in your efforts to build an inclusive digital platform can help create a sense of shared purpose — one many people are likely to rally around.
How are inclusive design and accessibility different?
You may have heard these terms used in similar contexts. While they overlap in meaning, they’re not the same thing.
By definition, accessibility focuses on accommodating people with varying physical and mental abilities. Accessible websites are measured by their conformance with Web Content Accessibility Guidelines, which pertain to things like auditory, cognitive, physical, and visual disabilities. Accessibility tests typically cover code-level issues that can be fixed in the source code of a site.
Inclusive design is about accommodating the entire spectrum of human diversity. It involves a variety of viewpoints, including those of people with disabilities. Inclusive solutions can involve anything from back-end coding to the way headlines are worded.
In a nutshell: An accessible site is one of the outcomes of an inclusive design, whereas inclusive design is the overall approach to creating accessibility.
Consider these examples:
- You’re filling out a form, and because you have a visual impairment, you’re using the keyboard to move through it. When you get to the end, you discover the form can’t be submitted because you left a few areas blank — even though you filled out every question asked. Turns out the keyboard had skipped past a few required fields. What a pain!
- While filling out a form, you’re asked to select your ethnicity from a list. As you read the options, you discover that yours is not listed, or that you identify with more than one. You feel like the “other,” compared to everyone else, leaving you frustrated about the task and… maybe even about the company too.
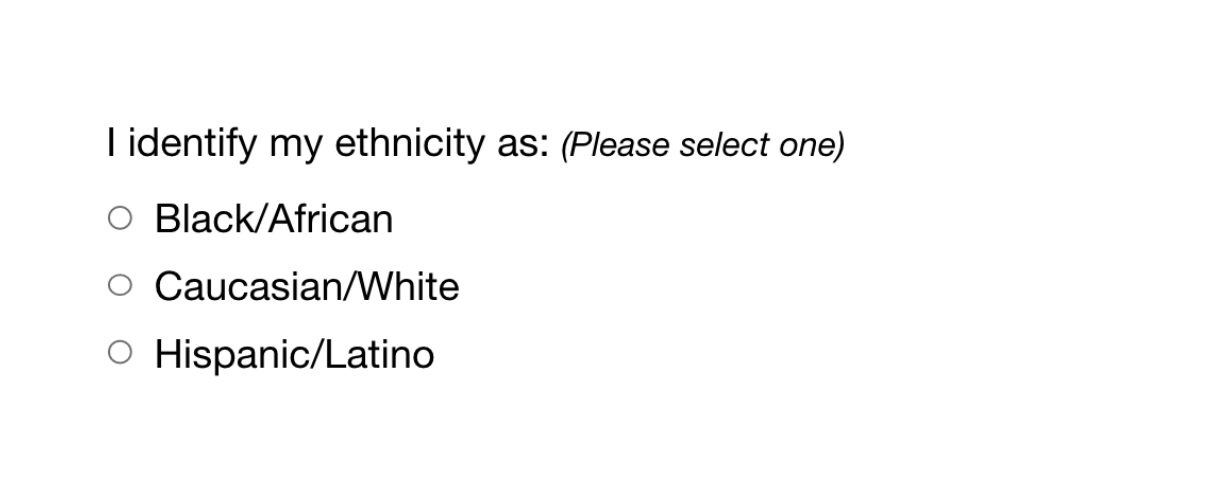
While both issues are addressed by inclusive design, the first issue relates to ability and can be fixed within the code, while the second relates to diversity and will take additional measures to address.
How Can You Make Your Platform More Inclusive?
The ethnicity example raises some interesting questions, such as:
- How do you know which ethnicities to add?
- How many do you need to account for?
- Should you just change the way the question is worded?
- Do you need to ask the question at all?
Mainly, this raises a bigger question: how do you maintain an inclusive site when there are so many important and broad variables (ability, language, culture, gender, age, etc.) — especially when that list of variables continues to grow and change?
The best way to get started is to arm yourself with knowledge and create a plan.
1. Identify the problems to solve.
Start by identifying opportunities for improvement in your current user experience (UX) by collecting quantitative and qualitative research with tools like UX audits, user interviews, user recordings, and heatmaps. Keep an eye out for areas where users seem confused, backpedal, or struggle to complete tasks. The more information you gather, the better!
2. Determine the best solutions.
Your user research will likely uncover many possible paths to change. This may include adding more categories to a list, creating an “Other” field users can type any answer into, or adding options to gather additional information.
Note: It’s common for areas that need improvement to hit on sensitive topics, things you may not fully figure out through data and research. Remember that the goal is understanding. Don’t be afraid to reach out to others for their thoughts and opinions.
3. Measure the results.
Some measures of success are easy to determine from user data in Google Analytics or changes in heatmaps and user recordings. Further data can come from users via surveys asking how your audience feels about the changes. The key is to stay continuously informed and aware of what your users are experiencing.
Note: One helpful tool for checking whether your design is, in fact, inclusive is Cards for Humanity. It offers a fun way to make sure you’re not missing anyone or anything in the spectrum of inclusivity.
Remember that the process of creating an inclusive design doesn’t end with implementation. Inclusive design is a work in progress. As a field, inclusive design is always evolving and requires continuous research to develop best practices.
We can’t predict what kind of mismatched interactions users will face in the years to come. But, with an open mind and a desire to learn and grow, we can continually adapt to meet them.
We’ve only scratched the surface of inclusive design! If you have any questions about inclusive design, we’d love to chat. Contact us anytime.
Google Analytics 4, or GA4, is Google’s fourth iteration of its website analytics platform. This is no ordinary upgrade! Leveraging the power of big data and machine learning, GA4 offers entirely new ways to collect and analyze user activity data across websites and apps.
While GA4 provides access to robust new tools and features for data-driven decision making, it also sheds many of the metrics and reports we’re used to in Google Analytics 3 (a.k.a. Universal Analytics, or UA).
Google will be sunsetting UA properties in July 2023. Here’s what you need to know about GA4’s capabilities — and why you should start the transition sooner rather than later.
Not sure which platform you currently have (UA vs. GA4)?
Take a look at this cheat sheet.
Key Benefits of Google Analytics 4
We’re living in a more privacy-centric world, and GA4 is Google’s answer to stricter data laws and browser regulations. GA4 is designed to function without third-party cookies, using machine learning and statistical modeling instead to collect data.
This change comes with a range of benefits, from more actionable user insights to enhanced reporting capabilities.
Broader Insights
Unlike UA, GA4 has the ability to track users across devices and platforms, combining all the data into a single property with a unified set of metrics and dimensions. This gives you a more complete picture of how users interact with your brand, whether they’re on your website, your mobile app, or both.
Another major advantage is that you can more effectively track conversions — particularly for users that might visit on their mobile, come back on desktop, and then download/purchase/register through your app. Because GA4 attributes actions to users across devices and platforms, you can see the entire journey a user takes from start to finish.
Predictive Metrics
Using machine learning, GA4 offers powerful new metrics to predict user actions and includes new data buckets like Acquisition, Engagement, Monetization, and Retention. These predictive metrics can help you better understand your audience and make more informed decisions, so you can do things like tailoring your website experience for different users or creating targeted marketing campaigns.
Customized Reporting
UA offers a set of standard reports with some customization options. By contrast, GA4 enables and encourages users to create custom reports with only the data they need.
With greater freedom to create reports, you can declutter your dashboard and make decisions more quickly by drilling down to the data that’s most important to you. You can even create a separate “Audiences” report with custom user definitions, further tailoring the data to support your business needs.
Key Features of Google Analytics 4
With comprehensive user tracking, predictive metrics, customizable reports, and more, GA4 promises to be much more powerful than any previous version of Google Analytics. Here are the core capabilities driving all of those benefits.
Event-Based Tracking
One of the biggest changes in GA4 is how user data is collected. In UA, data is collected via tags placed on each page of a website. Users are tracked via sessions, or set periods that begin and end when a user enters and exits a site.
Instead of relying on pageviews and sessions, GA4 tracks user interactions, known as “events,” as users complete them. This focus on individual user interactions provides a more complete picture of each user’s journey across your website or app.
This event-based model also makes it possible to track interactions that don’t happen on web pages but can be influenced by digital marketing, such as in-store visits or in-app purchases. And, it allows Google to more accurately deduplicate users.
Cross-Platform Data Consolidation
In UA, “properties” are where Analytics data is collected for individual websites and apps. You can then use views to see and report on the data in various ways.
GA4 uses individual data streams to combine data from different platforms into a single property. You can add multiple data streams into a property and create different views based on certain criteria.
For example, you could create a stream for all web traffic, a stream for all app traffic, or a stream for traffic from both that covers a given geographic area. By placing the same tracking code across different digital platforms, you can consolidate data to track users who move between the streams.
Advanced Analytics
Maybe the most exciting feature for data geeks like us, GA4’s Explorations Hub offers a suite of advanced data and analytical techniques that go well beyond standard reports. The Explore section lets you create custom analyses to uncover deeper insights about your website and app performance, with filters and segments so you can drill down even further.
GA4 also integrates with BigQuery, Google’s cloud-based data warehouse, where you can run complex analyses of very large datasets. Bonus: BigQuery offers near-unlimited data storage.
Machine Learning
In an increasingly cookie-less world, Google is attempting to balance privacy limitations with usable insights. Using machine learning, GA4 fills in data gaps and provides predictive insights about user behavior and trends.
Machine learning combines artificial intelligence (AI) and computer science to fill in gaps and make predictions. It essentially looks for patterns of activity that can be fed into an algorithm to understand and predict how users behave online.
As an example, GA4’s AI-powered insights can help identify user actions that are most likely to lead to conversions. Using metrics like purchase probability, churn probability, and revenue prediction, you can customize marketing campaigns or target specific audiences to achieve your conversion goals.
Why You Should Switch to GA4 ASAP
You’ll be able to collect and use platform data in your existing UA property until July 1, 2023. After that, you’ll be able to access historical data for only six months. That’s why we strongly recommend you implement GA4 as soon as possible.
Transitioning now will allow you to:
Feed The Machine
Many of GA4’s core features rely on machine learning, and in order for machine learning to be effective, the algorithm needs time to learn. The sooner you set up and start collecting data in GA4, the more time your models will have to analyze and learn, shaping the insights you’ll need down the road.
Train Your People
Those using GA4 will need time to learn the new terminology, user interface, and capabilities. Switching early gives your team time to get used to the new platform and work out new processes and reporting while you still have UA to fall back on.
Get Year-Over-Year Data
GA4 is forward-facing only, which means your new GA4 property will only collect data from the time of creation; it won’t import past data from UA. Once UA sunsets next year, you’ll be relying solely on GA4 for year-over-year data.
Why does that matter? Here at Oomph, when we launch client projects, we use Google Analytics data to analyze digital platform performance so we can develop the best possible user experience. By examining user flows, page visits, common search terms, engagement metrics, and more, we can very quickly get a picture of where a platform has strengths and weak points. And we need your historical data to do it.
Ready to switch to Google Analytics 4? It’s a relatively simple process. Just follow the steps Google provides, whether you want to switch from UA to GA4 or set up a GA4 property alongside an existing UA property.
If you’re not feeling confident about handling the transition alone, we’d love to help. Get in touch with us today.
Many organizations today, large and small, have a digital asset problem. Companies are amassing huge libraries of images, videos, audio recordings, documents, and other files — while relying on shared folders and email to move them around the organization. As asset libraries explode, digital asset management (DAM) is crucial for keeping things accessible and up to date, so teams can spend more time getting work done and less time hunting for files.
First Things First: DAM isn’t Dropbox
Some folks still equate DAM with basic digital storage solutions, like Dropbox or Google Drive. While those are great for simple sharing needs, they’re essentially just file cabinets in the cloud.
DAM technology is purpose-built to optimize the way you store, maintain, and distribute digital assets. A DAM platform not only streamlines day-to-day content work; it also systematizes the processes and guidelines that govern content quality and use.
Today’s DAMs have sophisticated functionality that offers a host of benefits, including:
- Providing efficient access for internal and external teams
- Streamlining workflows for sharing drafts and getting approvals
- Serving images in multiple sizes and formats, reducing duplication
- Enabling AI-powered categorization, tagging, and license tracking
- Preventing versioning and legal issues around asset use
Is it time for your business to invest in a DAM? Let’s see if you recognize the pain points below:
The 5 Signs You Need a DAM
There are some things you can’t afford not to invest in if they significantly impact your team’s creativity and productivity and your business’s bottom line. Here are some of the most common signs it’s time to invest in a DAM:
It takes more than a few seconds to find what you need.
As your digital asset library grows, it’s harder to keep sifting through it all to find things — especially if you’re deciphering other people’s folder systems. If you don’t know the exact name of an asset or the folder it’s in, you’re often looking for a needle in a haystack.
Using a DAM, you can tag assets with identifying attributes (titles, keywords, etc.) and then quickly search the entire database for the ones that meet your criteria. DAMs also offer AI- and machine-learning–based tagging, which automatically adds tags based on the content of an image or document. Voila! A searchable database with less manual labor.
You have multiple versions of documents — in multiple places.
Many of our clients, including universities, healthcare systems, libraries, and nonprofits, have large collections of policy documents. These files often live on public websites, intranets, and elsewhere, with the intent that staff can pull them up as needed.
Problem is, if there’s a policy change, you need to be sure that anywhere a document is accessed, it’s the most current version. And you can’t just delete old files on a website, because any previous links to them will go up in smoke.
DAMs are excellent at managing document updates and variations, making it easy to find and replace old versions. They can also perform in-place file swaps without breaking the connections to the pieces of content that refer to a particular file.
You’re still managing assets by email.
With multiple team members or departments relying on the same pool of digital assets for a variety of use cases, some poor souls will spend hours every day answering email requests, managing edits, and transferring files. The more assets and channels you’re dealing with, the more unwieldy this gets.
DAMs facilitate collaboration by providing a single, centralized platform where team members can assign tasks, track changes, and configure permissions and approval processes. As a result, content creators know they’re using the most up-to-date, fully approved assets.
Your website doubles as a dump bin.
If your website is the source of assets for your entire organization, it can be a roadblock for other departments that need to use those assets in other places. They need to know how to find assets, download copies, and obtain sizes or formats that differ from the web-based versions… and there may or may not be a web team to assist.
What’s more, some web hosting providers offer limited storage space. If you have a large and growing digital library, you’ll hit those limits in no time.
A DAM provides a high-capacity, centralized location where staff can easily access current, approved digital assets in various sizes and formats.
You’re duplicating assets you already have.
How many times have you had different teams purchase assets like stock photography and audio tracks, when they could have shared the files instead? Or, maybe your storage folders are overrun with duplicates. Instead of relying on teams to communicate whenever they create or use an asset, you could simplify things with a DAM.
Storing and tagging all your assets, in various sizes and formats, in a DAM enables your teams to:
- Make the most of the assets you own
- Avoid creating unnecessary copies
- Access optimized versions for different applications
- Keep track of how many times each asset is used
When Should You Implement a DAM?
You can implement a DAM whether you have an existing website or you’re building a new one. DAM technology easily complements platform builds or redesigns, helping to make websites and intranets even more powerful. Organizing all of your assets in a DAM before launching a web project also makes it easier to migrate them to your new platform and helps ensure that nothing gets lost.
Plus, we’ve seen companies cling to old websites when too many departments are still using assets that are hosted on the site. Moving your assets out of your website and into a DAM frees you up to move on.
If you’re curious about your options for a DAM platform, there are a number of solutions on the market. Our partner Acquia offers an excellent DAM platform with an impressive range of functions for organizing, accessing, publishing, and repurposing assets, automating manual processes, and monitoring content metrics.
Other candidates to consider include Adobe Experience Manager Assets, Bynder, PicturePark, Canto, Cloudinary, Brandfolder, and MediaValet.
Given the number of DAMs on the market, choosing the right solution is a process. We’re happy to share our experience in DAM use and implementation, to help you find the best one for your needs. Just get in touch with any questions you have.