
The authoring experience is core to any content management system. Very few web content admins prefer to work in HTML, so they use a What-You-See-Is-What-You-Get editor nicknamed a WYSIWYG (pronounced whizzy wig
). There are many free and paid WYSIWYG solutions out there, but the big two that have been around for 10 years or more and have been adopted into widely available open source projects are CKEditor and TinyMCE. Drupal and WordPress long ago decided to pick one as their recommended editor, and so WordPress uses TinyMCE and Drupal uses CKEditor[1].
The power of a WYSIWYG like CKEditor is in its ability to be customized. Drupal makes it easy to customize the authoring experience for any user role and in any configuration that a site needs. Super Admins can have access to a fully featured “Full HTML” version of the editor while your content authors have access to a “Basic HTML” version that locks out certain kinds of code that may do harm to a website.
Oomph customizes CKEditor for each custom Drupal (or WordPress) site we build. As a best practice, though, we like to start from the same place. We’d like to share our “default” CKEditor set up as well as the steps that you need to take to customize CKEditor yourself.
Customize CKEditor Text Formats by User Roles
Drupal allows multiple CKEditor configurations, and each can be available per user role — as mentioned previously. To understand the ways in which the editor can be customized, we first need to understand the user roles and default configurations.
User Roles
Drupal ships with three main user roles built in — Administrator, Authenticated User, and Anonymous User. More official documentation about User Roles is available from drupal.org.
An Anonymous user is someone that can’t log in — they can only view content on the front end of the site. To call them a “user” is a bit of a misnomer, but their actions are being tracked to the user ID of zero — therefore, Drupal still considers them a user.
An Authenticated user is someone that can log in but they can do very little. A new Drupal installation gives this user only a few permissions — they view Media, view published content, use shortcuts, and use the Basic HTML text format.
Finally, the Administrator can do everything by default. This was the first user created when a new site was installed, and by default, the account has permissions to do everything.
Many more roles can be created and permissioned of course, but these are the ones that come out of a default Drupal install. We usually create a new “Content Editor” user role for our clients as authors on the site with permissions to create and edit content.
Text Formats and Editors
CKEditor is included in Drupal core, so it comes pre-installed. There are three “text-formats” that the default installation of CKEditor comes with — Full HTML, Basic HTML, and Plain text.
These distinctions are very handy, and also by default, they map nicely to the User Roles we described. Plain text for Anonymous users with no ability to create content, Basic HTML for Authenticated users who might be able to author some content, and Full HTML for Administrators that need to have all of the elements that HTML provides.
The Plain text format is there when there is no other format available to a user — there is no WYSIWYG at all, therefore a <textarea> form element is naked of any formatting embellishments.
It is recommended to keep the Plain text editor plain and edit the format as little as necessary, if at all. When starting a new project, we edit the Basic and Full HTML formats to customize them to our liking.
Basic HTML
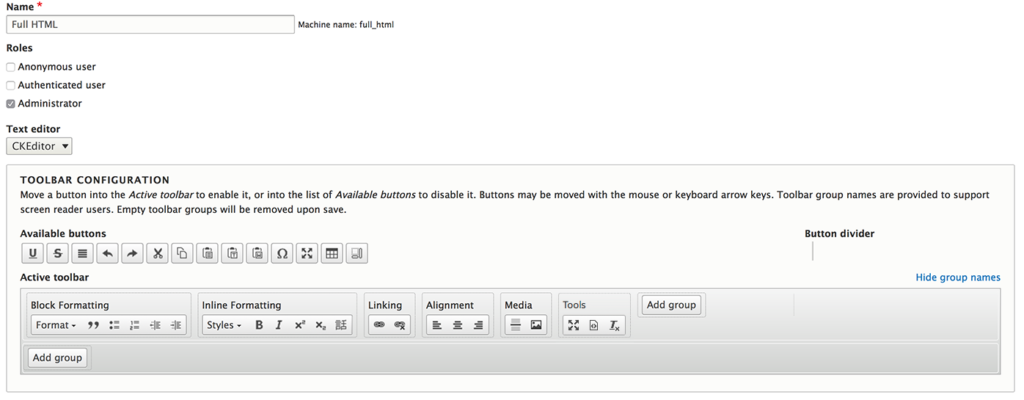
The Basic HTML editor comes with a small set of options by default — all the controls that you might expect from a rich text web editor, like heading formats, lists, blockquotes, alignment, bold, italic, and others. These options are a little disorganized, in our opinion[2], but since this is Drupal, we can customize it easily.
Out of the box, the Basic HTML format looks like this:
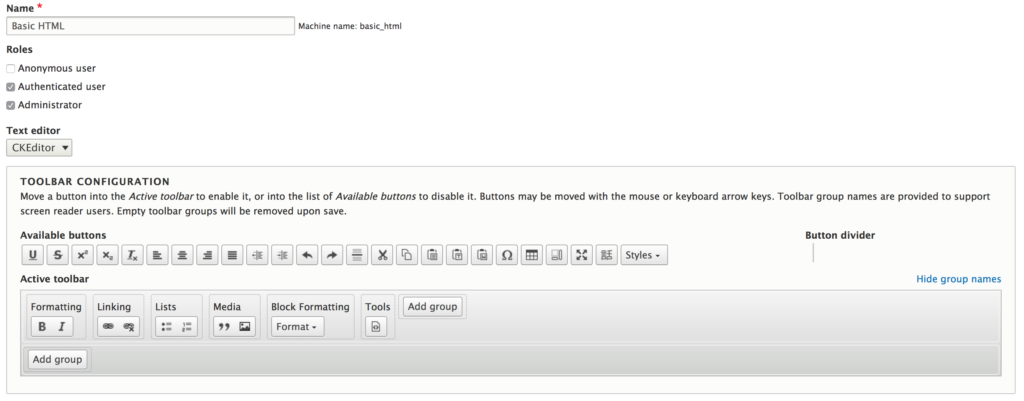
In the Toolbar Configuration area, admins can move “Available buttons” from the top row to the “Active Toolbar” below, and arrange them however they wish. We like to follow this grouping of button options:
- Block formatting: All of the HTML block-level elements — the Format drop down, Blockquote, Unordered list, and Ordered list
- Inline styles: Bold, Italic, Superscript, and Subscript. We don’t use the Strikethrough because it is seldom used and the Underline option because we wouldn’t want a visitor to confuse underlined text as a link if it is not
- Alignment: Left, Center, and Right. We don’t use Justify because it always looks bad (again, in our opinion)
- Linking: Add a link, Remove a link
- Insert: Anything that gets inserted into content — Horizontal rule, Paste plain text, Paste from Word (read an aside about this feature later on in the article). Basic HTML does not include an Image insertion from the Media Library for most sites
- Tools: Options for looking at the content differently — Full screen, Source view, and Remove content formatting
After the changes are made and saved, the Basic HTML text format looks like this:
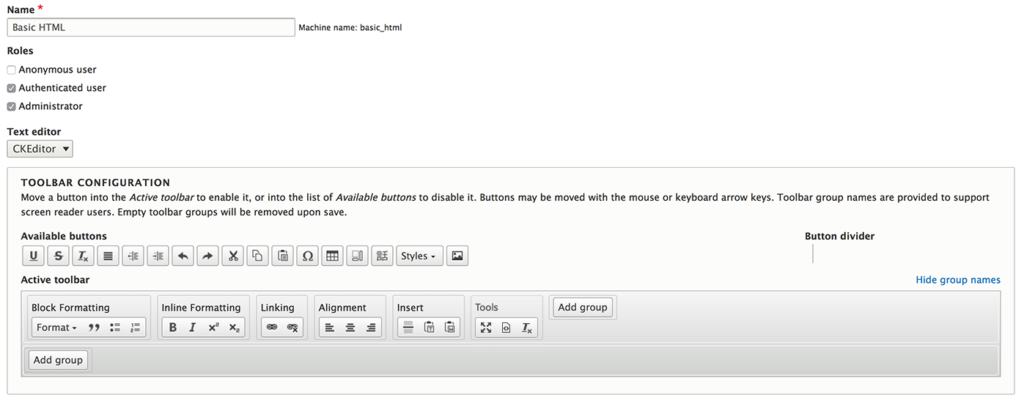
Much better. From here we will probably customize it further as additional modules or custom features add buttons that we decide to turn on for content authors.
One more thing should be looked at before finishing the Basic HTML Text format. If the “Limit allowed HTML tags and correct faulty HTML” filter is enabled (should be the first checkbox right under the Toolbar configuration), there will also be a Filter Settings area at the bottom of the admin page where the allowed HTML is displayed:
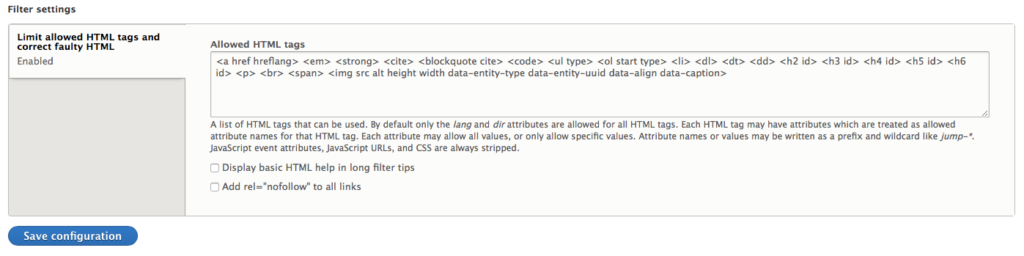
The default allowed HTML for Basic is:
<a href hreflang> <em> <strong> <cite> <blockquote cite> <code> <ul type> <ol start type> <li> <dl> <dt> <dd> <h2 id> <h3 id> <h4 id> <h5 id> <h6 id> <p> <br> <span> <img src alt height width data-entity-type data-entity-uuid data-align data-caption>
We edit ours slightly as follows to be more restrictive:
<a href hreflang target rel> <em> <strong> <cite> <blockquote cite> <code> <ul> <ol start> <li> <dl> <dt> <dd> <h1> <h2> <h3> <h4> <h5> <h6> <p class=""> <br> <img src alt height width> <hr> <sup> <sub> <span lang dir>
Limiting code for the Basic HTML Text format is a good idea. Authors may think that code copied from the web somewhere is fine because it will help them do this one thing, but more often that not it introduces display issues, and at worst, it introduces something malicious.
Full HTML
For Full HTML, the same ideas apply but with a few more options. Again, the default Drupal configuration for the Full HTML text format is this:
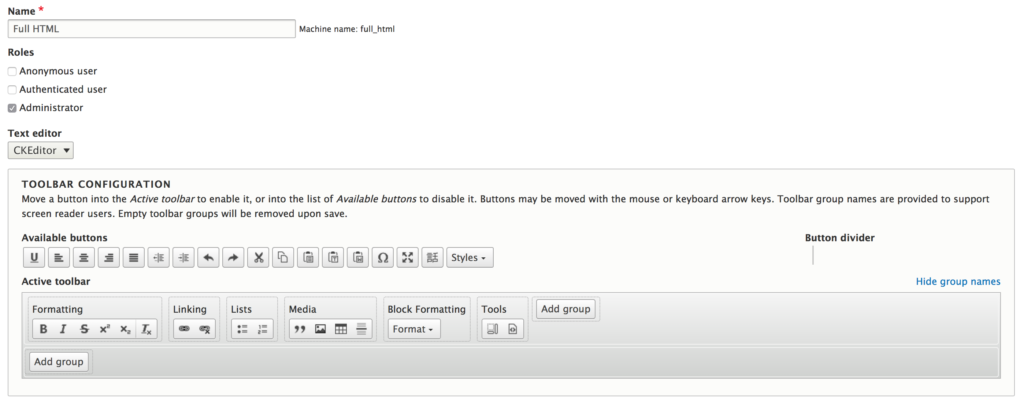
Not very different from the previous text format — a little more robust — and we improve it our own way.
In addition to the same order and grouping as Basic HTML, we:
- Add Indent and Outdent to the Block formatting group. This is not a semantic HTML element but it will affect an entire block element by adding a class to the block HTML item
- Add the Styles drop down menu which enables custom classes for this project. We also add the Language formatting to the Inline group. On a per-project basis, we may decide to give these options to the Basic HTML text format
- Add Media to the Insert grouping and remove the paste options[3]
After adding Styles, Media, and Language, we get additional plugin settings below the Toolbar Configuration. For Media, edit those settings as you see fit. We try to keep uploads small and force Drupal to compress images that are uploaded straight from a camera. For Languages, depending on the site, you might want to enable to full set of language codes rather than the default six official languages of the United Nations.
Custom Theme Classes in CKEditor
To leverage the power of custom author styles, the Styles dropdown plugin setting is super important. This is how you get theme CSS classes into the editor! The list should take the format of [HTML element to apply the class to].[name of class]|[Label to display to user]
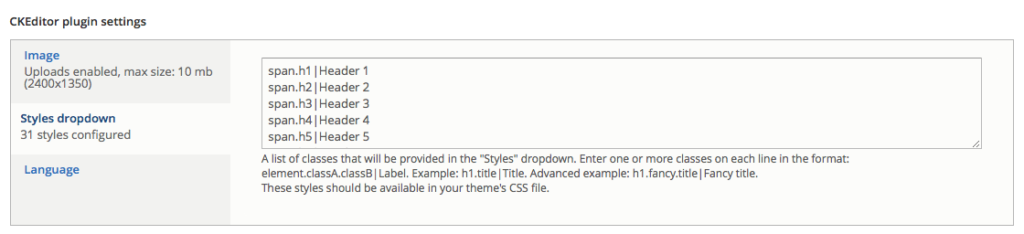
A subset of the styles that we add are as follows, and might look familiar to people that use Bootstrap utility classes:
p.lead|Paragraph Lead
ul.list-unstyled|List unstyled
span.display-1|Display1
span.display-2|Display2
span.display-3|Display3
span.h1|Header 1
span.h2|Header 2
span.h3|Header 3
span.h4|Header 4
span.h5|Header 5
span.h6|Header 6
span.text-small|Text size small
span.text-lowercase|Text Lower case
span.text-uppercase|TEXT ALL CAPS
span.text-abbr|Abbreviations
span.font-weight-light|Text light weight
span.font-weight-normal|Text normal weight
span.font-weight-bold|Text bold weight
Drupal does not allow the CSS * selector, which would mean that the requested class could be added to any HTML element — the rule can’t look like *.class-name|A Universal Style, for instance. That’s too bad, which is why we do the next best thing and apply most of our custom styles to <span> elements.
These settings allow an author to mix visual heading styles without changing the semantics. We find that it works pretty well. Say, for example, someone is designing the content for their page and they understand that an article with an H1 title needs to have subheads that are H2, and between H2s, you should only use an H3, etc… they understand the semantic structure of the page. But visually, maybe they want the H2s to look like H3s, and the H3s to look like H4s. That can be accomplished with the way we have structured our class naming and the application to <span> tags. The resulting HTML might look like this:
<h1>An introduction to CKEditor</h1>
<h2 class="h3">What is CKEditor?</h2>
<h2 class="h3">Customizing CKEditor</h2>
<h3 class="h4">Basic HTML</h3>
<h3 class="h4">Full HTML</h3>
<h2 class="h3">Getting theme CSS into the Editor</h2>
We get the semantics needed for good SEO and great accessibility, and the author gets the page to look they way that they want.
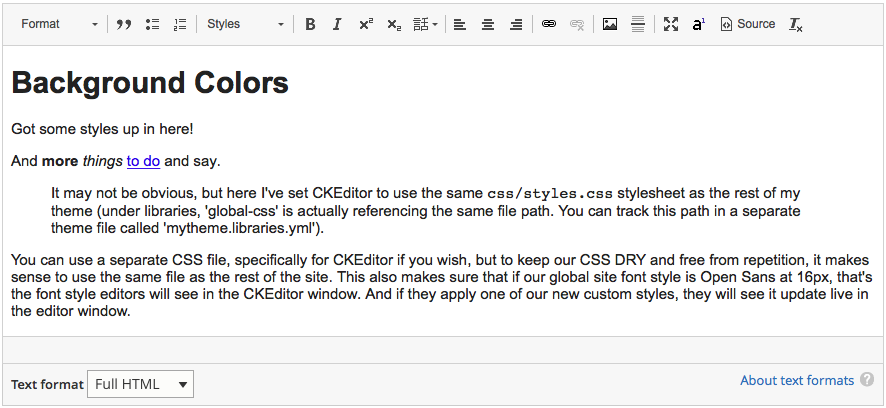
Matching the preview in CKEditor with your Site Theme
To finalize the customization and to give the author a much more complete experience, we add some code to our site’s theme files that injects the custom visual theme into the CKEditor preview pane. The authors, therefore, will get a much better sense of how their content will look because they will see the site’s fonts, colors, and typography styles.
We go from this:
To this:
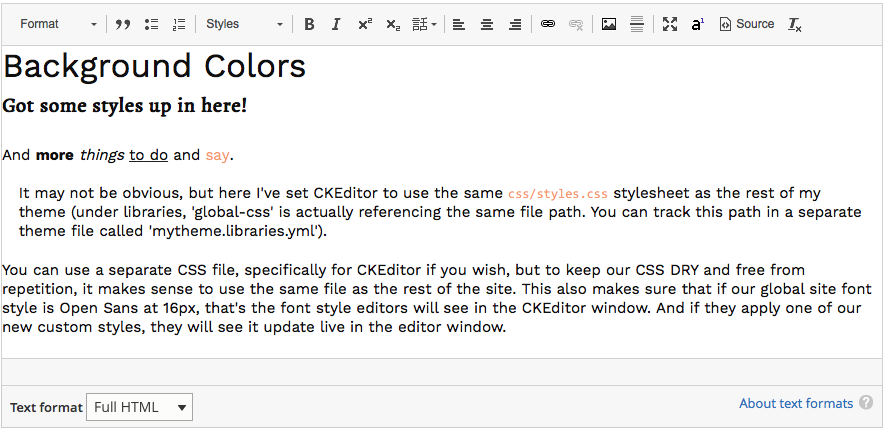
By just adding a little bit of code to the theme’s info file, or themes/custom/yourtheme/yourtheme.info.yml:
ckeditor_stylesheets:
  - assets/styles/main.cs
You can use a separate CSS file specifically for CKEditor if you wish, but to keep our CSS DRY, it makes sense to use the same file as the rest of the site — its already loaded and cached after all. When authors apply one of our new custom styles from the Styles dropdown menu they will see it update live in the editor window before they save and view the content.
And that’s it! Your Drupal 8 project has a customized admin experience with CKEditor sharing the same visual styles as your front end.
# Cleaning Text Pasted from Word
Now for a tangent into the world of pasting content from a Microsoft Word document.
Clients are going to cut and paste text from Word documents; you just can’t stop them. Luckily, CKEditor has a robust scrubber that will remove the junk from this code and maintain the most important styling like bold, italic, and headers (even tables if your editor allows them).
The way it works is pretty transparent, too. We keep the button in place for folks who might have used it before, but with CKEditor version 4, anything on the clipboard pasted into the editor will get scrubbed. When the editor detects code on the clipboard that contains junky content from Word, a little notification will pop up and let the user know that it sees what you are doing (shame shame) but it will clean it for you.

If you press Cancel, the content gets pasted without being scrubbed, while if you press OK, it will. Either way, the paste of new content happens and the allowed tags portion of the Editor configuration will kick in and do its job (which may remove some of the code from Word, but probably not all).
Test it yourself with the sample Word document on this page: ckeditor.com/docs/ckeditor4/latest/features/pastefromword.html
Just one Gotcha
But there is a pretty big catch to all of this. It might seem obvious, but it needs to be stated — don’t expect Paste from Word to work unless “Limit allowed HTML tags and correct faulty HTML” is turned on. If you are using the Full HTML text format, and the format allows any and all HTML code, Paste from Word will do nothing!
We had a scenario in which the client used the Full HTML editor because they needed access to Drupal Tokens and a few custom pieces that are rather advanced. When they pasted content from Word, though, they were getting all of the code that Word exports and the visual experience was not what they expected. When we took a look and saw the source code, we didn’t understand at first why the Paste from Word filter was not working.
What we (at Oomph) should have done was give them these advanced features in the Basic HTML editor, with “Limit allowed HTML tags and correct faulty HTML” turned on and perhaps a more complex and lengthy list of allowed HTML. This would have been a little more work but it would have saved time in the long run.
Sidebar to the Sidebar: Why is content from Word so bad?
You may be wondering, why does this matter? Microsoft Word is publishing software that 83% of the business world uses, how can it be that bad? Well, Word was created for the world of printing documents, not managing content on the web. On the web and in the projects we create, there is a visual theme that should control the look of all the content. The content pasted from Word tries to force its own visual styles over the styles of the custom theme. On top of all that, the code is terribly bloated.
Here is a simple example of a single three-word headline:
<h1 align="center" style="margin:12pt 0in; -webkit-text-stroke-width:0px; text-align:center"><span style="font-size:22pt"><span style="line-height:31.386667251586914px"><span style="break-after:avoid-page"><span style="font-family:"Times New Roman""><span style="font-weight:normal"><span style="caret-color:#000000"><span style="color:#000000"><span style="font-style:normal"><span style="font-variant-caps:normal"><span style="letter-spacing:normal"><span style="orphans:auto"><span style="text-transform:none"><span style="white-space:normal"><span style="widows:auto"><span style="word-spacing:0px"><span style="-webkit-text-size-adjust:auto"><span style="text-decoration:none"><span style="font-family:Georgia"><span style="color:black"> Recognition of Achievement</span></span></span></span></span></span></span></span></span></span></span></span></span></span></span></span></span></span></span></h1>
All this should actually be is:
<h1>Recognition of Achievement</h1>
In performance speak, that’s 922 bytes (one byte is one character) when it should be only 35 — an increase of 2600%!
All of these inline <span> tags with inline “styles” will override the site’s custom theme, making the content of this page look inconsistent. Some of these styles do nothing on the web at all — break-after:avoid-page, orphans:auto, and widows: auto are print styles, and the units pt and in are also for print. Other tags are inefficiently nested — font-family and color are declared twice (the innermost CSS rule wins, by the way). If you want to get really geeky, we discovered that the properties caret-color> and font-variant-caps are not even supported by Microsoft’s own web browser.
So yes, content cut and pasted from Word without any cleanup really is that bad.
What We Learned
- Custom site themes deserve a custom author experience as well
- Drupal 8 makes it easy to tailor the permissions, HTML options, and visual theme for the core of most authoring experiences, the WYSIWYG editor
- Pasting content from Word is terrible and bloated and will try to ruin the nice theme that you may have put in place, so make sure to enable “Limit allowed HTML tags and correct faulty HTML”
And knowing is half the battle… or maybe just one tenth.
Footnotes
- Drupal moved CKEditor into core in version 8. Previously, developers needed to pick their preferred editor and install it as a module. Return ⤴
- Why is Blockquote grouped with Media, like an image? No text alignment? “Formatting” and “Block Formatting” as labels? C’mon Drupal, we can do better. Return ⤴
- Removing the paste option is important as you can read in another section. Since this Text Format allows all HTML, using the paste tools would do nothing to strip content of bad HTML and styles. Return ⤴
“I want to go fast
– Ricky Bobby”
We live in a world of “instant”. And while this isn’t a new concept, we’ve gone from things like instant coffee and microwavable meals to instant messenger, video on-demand, same-day delivery, order ahead, and a list of instant services that continues to grow. The fact is that most people prefer not to wait, and if they have to wait for you, they’ll just go somewhere else.
It’s no different for people browsing the internet. Whether someone is passively browsing through articles, scouring reviews on a restaurant for dinner tonight, or shopping for the best deal on that toaster they want, they are not going to put up with a slow loading website. Why? Because a quick loading website provides a more pleasant, less frustrating user experience. According to a great infographic published by KISSmetrics in 2011, 47% of all users expect a website to load in 2 seconds or less. To complicate matters, this same expectation is becoming true of mobile users.
Does your website load that fast? If you’re not sure try running some quick tests on a free website speed test tool like Pingdom. If your site is not up to par, it’s not just a bad user experience; it’s costing you money.
How Poor Site Speed is Costing You Money
There are a number of factors and ways that a slow loading website could be costing your organization money. Let’s consider just a few:
Poor Site Speed Hurts SEO
Since 2010, Google has plainly stated that website speed is an important ranking factor in organic search results and overall SEO. Why? If you perform a search in Google and they return results that include slow loading websites, you are going to click on that result, and then bounce right back to the search results to try another one (this action is often referred to as “pogo sticking”).
Google Search is in the business of providing their users with results that are BOTH relevant AND provide a good user experience. If your website is slow to load, it won’t matter if you have great, relevant content. You simply won’t rank as a high in search results and thus you will get less traffic and need to supplement this through other paid strategies.
Decreased Conversion Rates
According to the above referenced KISSmetrics infographic, A 1-second delay in page response can result in a 7% reduction in conversions
.
So let’s do a little math. Say your ecommerce site currently has a 2% conversion rate and that equates to around $50,000 in sales each day. If you were to improve the page speed of your checkout process by 1 second, you would earn an extra $1,277,500 in sales each year.
Reduced Customer Satisfaction
Think of the last time you went to a restaurant that had really slow service. There was an extremely long wait to be seated. When you finally arrived at your table, it took a long time for the waiter to come to your table. After putting in your drink order, they finally arrived some 30 minutes later. And the rest of the night continued in this fashion. Now reflecting on that experience, will you ever go back? Would you recommend that restaurant to someone else?
According to that KISSmetrics infographic, 79% of shoppers who are dissatisfied with website performance are less likely to buy from the same site again.
And they are certainly not going to recommend your site to their friends via social media or word of mouth. Not only that, they’re likely to leave negative feedback or comments which will deter future prospective customers. There is no telling how much lost revenue this might result in.
Increased Operating Expenses
“Can’t you just throw more resources at the problem?” Sure! But it will cost you…
In some cases, it may be the right move to increase the number of web or database servers to your hosting environment. In others, you may need to add additional RAM or vCPU’s. But you might just be treating the symptoms and not curing the actual problem.
Your website might contain slow executing queries, functions or methods, and loops throughout the application that require optimization. It’s also possible that there are numerous notices, warnings, or errors being generated in log files that need to be addressed.
Before simply throwing more money at the problem, we’d recommend you having an experienced development team audit your site’s code first.
Simple Steps to improve your Site Speed
There are actually some simple things that can be done to improve your overall site speed that are often overlooked.
- Optimize — compare the size of the source file compared the to size it renders in the layout—or reduce the number of images on your site
- Improve the quality of your hosting. A vendor experienced with your CMS might have better tools specifically for that platform plus some vendors support HTTP/2, a much faster protocol, as well as PHP7
- Remove unused plugins or modules
- Decrease the number of external files being called, such as ad services or JS files
- Use a CDN to load asset files such as images, media files, or CSS
- Minify to remove whitespace in files (make them smaller) and concatenate files together to reduce the number of HTTP requests per page load
- Leverage server and browser caching on static content and pages
Advanced Ways to Increase Site Speed and Revenue
Beyond some of these simple steps, there are more complex solutions to your site speed problems. For example, websites that have a lot of dynamic or personalized content such as e-commerce and membership sites can pose challenges to efficient caching. Or, depending upon the amount of traffic your website receives, your codebase may pose challenges to scaling to support large amounts of concurrent traffic.
In either case, we’d suggest having an engineer review your website’s code to identify any inefficiencies or legacy functions that could be optimized. In addition, we’d recommend speaking with a strategist or UX engineer to look for opportunities to simplify and improve the user experience.
One thing’s for sure; site speed matters! If you’d like to chat more about ways to improve the speed and performance of your website, drop us a line. We’ll try to get back to you as quickly as possible 😉
Build tools and task runners were invented to prevent human error and make your life easier. They can bring you workflow nirvana, or cost you countless hours of aggravation and misery. There are quite a few options getting love from developers these days, so choosing your side can certainly be overwhelming — especially when new options seem to be popping up every day!
Everyone’s Got Choices
Which tool is the best fit for you and your project? The short answer is any of them. If you’re at the point where you’re trying to automate your process then you’re already doing something right, so good on you! The long answer, however, brings us to the battle between Brunch and Gulp.
Meet Brunch
Brunch entered the game in 2011 with two core principles in mind: keep it simple and make it speedy. It makes a few assumptions (see also: limitations) about your project, but in return it gives you an extremely simple project setup that runs incredibly quick.
Meet Gulp
Gulp is the “code over configuration” tool that won our hearts in the last showdown. It’s a super customizable tool with a pretty impressive plugin library that’s gained a lot of popularity in recent years.
Ready? Fight!
Both of these tools are great, but there’s definitely pros and cons for each. We’re going judge these on five areas of importance — documentation, configuration, community, customization, and speed. Best three out of five takes the cake! (The cake is a lie.)
Tell me something good (documentation)
Brunch has a detailed set of documentation on its site that will get you up and running quickly. The detailed explanations behind core concepts cover getting started, installing plugins, installing JS modules, testing, and deploying. It’s organized, the information is well explained, and there are little brunch puns littered throughout (bonus!).
Gulp’s documentation is it a little bit harder to navigate. Visiting the “Docs” section of their website brings you to some documentation that resides in their GitHub repo, but there’s also an entire readme.io version of the information that’s somewhat overlapping but different. Overall, it’s pretty extensive, albeit a little less organized than Brunch’s. Much like the other, you’ll find a section on getting started with Gulp, and some information on using the API and CLI. There’s also a great jumpstart guide for writing your own Gulp plugin.
Winner: Brunch (barely)
Start me up (configuration)
This is where Brunch really shines. It makes a few assumptions about your project (outlined here), but also makes setting up your project a breeze. A typical config for Brunch might look something like this:
module.exports = {
  files: {
    javascripts: {
      joinTo: {
        'vendor.js': /^(?!app)/,
        'app.js': /^app/
      }
    },
    stylesheets: {joinTo: 'app.css'}
  },

  plugins: {
    babel: {presets: ['es2015', 'react']}
  }
};
Conversely, Gulp makes no assumptions. You’ll need to tell Gulp everything about how it should run, but it’ll also be a lot more customizable this way. A typical Gulp set up might look something like this:
var gulp = require('gulp');
var coffee = require('gulp-coffee');
var concat = require('gulp-concat');
var uglify = require('gulp-uglify');
var imagemin = require('gulp-imagemin');
var del = require('del');

var paths = {
  scripts: ['client/js/**/*.coffee', '!client/external/**/*.coffee'],
  images: 'client/img/**/*'
};

/* Register some tasks to expose to the cli */
gulp.task('build', gulp.series(
  clean,
  gulp.parallel(scripts, images)
));
gulp.task(clean);
gulp.task(watch);

// The default task (called when you run `gulp` from cli)
gulp.task('default', gulp.series('build'));


/* Define our tasks using plain functions */

// Not all tasks need to use streams
// A gulpfile is just another node program and you can use all packages available on npm
function clean(done) {
  // You can use multiple globbing patterns as you would with `gulp.src`
  del(['build'], done);
}

// Copy all static images
function images() {
  return gulp.src(paths.images)
    // Pass in options to the task
    .pipe(imagemin({optimizationLevel: 5}))
    .pipe(gulp.dest('build/img'));
}

// Minify and copy all JavaScript (except vendor scripts)
// with sourcemaps all the way down
function scripts() {
  return gulp.src(paths.scripts, {sourcemaps: true})
    .pipe(coffee())
    .pipe(uglify())
    .pipe(concat('all.min.js'))
    .pipe(gulp.dest('build/js'));
}

// Rerun the task when a file changes
function watch() {
  gulp.watch(paths.scripts, scripts);
  gulp.watch(paths.images, images);
}
Winner: Brunch, if brevity is your thing
I get by with a little help from my friends (community)
Brunch currently has just under 100 plugins to its name, while Gulp has upwards of 2,800. The wide difference here may be due, in part, to the fact that Brunch gained NPM support somewhat recently. Gulp also went out of their way to make plugin documentation easily accessible for developers, which may have also been a factor.
For any questions or issues you might have, Brunch has an active online forum you can post to and Gulp has a similarly active IRC channel. Both tools have active participants in Stack Overflow as well.
Winner: Gulp
You can have any color you want, as long as it’s black (customization)
Brunch is relatively limited in this category. As we mentioned earlier, it simplifies the setup process tremendously by making some basic assumptions about the setup of your project. Unfortunately, if you’re project is exceptionally unique it might be quite a headache trying to customize Brunch to work with what you’ve got.
Conversely, Gulp really shines here. The configuration file is definitely more demanding than Brunch’s, but it offers pretty much unlimited flexibility. You can control just about every aspect of the task runner through the many options made available to you in the Gulp API and CLI documentation. And, of course, those 2,800+ plugins don’t hurt either.
Winner: Gulp
If you’re not first, you’re last (speed)
Both of these tools are impressively speedy. Brunch makes speed one of its top priorities, and it uses incremental builds by default to filter out unchanged files in concurrent build processes, which makes it hands down one of the quickest processes we’ve worked with. Gulp also has the option of running incremental builds, but it requires you to set it up that way. (You can see how to do that here.) Even without that setup, Gulp runs a pretty efficient process overall by using node streams to prevent the potential bog down from writing intermediary files.
Winner: Brunch
And the winner is…
Our favorite meal, Brunch! But not by much. Your choice here will really depend on what you’re looking for in your build tool. Brunch is definitely the simpler option to get set up quickly, and it works well for us here at Oomph. If you’re the type of person who likes to control every aspect of your build or you have a really complicated and customized project setup, Gulp is probably the better choice for you. At the end of the day, what really matters is that you’re automating your process. The tool you use can certainly have an effect, but doesn’t make too much of a difference — go do it!
If you’re working in an industry that handles information relating to health care, there’s a good chance your organization has strict security practices and your next website refresh won’t be as simple as discovery-design-build-ship. There are going to be a lot of checkpoints along the way relating to security and governance—all designed to protect patients and customers and ensure control and privacy of sensitive data.
Factor in security while planning the project timeline
As you work to map out the project timeline, you must be aware of critical, albeit time-consuming, tasks that are not tied directly to the development of a website project.
When budgeting for the new project, be sure to factor in the time it will take to collaborate with vendors providing services to secure your site. It’s likely that your technical team, responsible for the build, will have their hands tied when it comes to configuring things like firewall settings, access whitelisting, and DDoS protection, and it isn’t always easy to predict how much time vendors will need to process your team’s requests.
Prioritize Security Testing
There are typically multiple rounds of security and penetration testing that need to happen before your organization will sign off on launching a new project. The testing window needs to be planned in advance, and it’s always a good idea to notify your hosting vendor to make sure they’re aware the testing is taking place. That way, they can disable monitoring and avoid false alarms. Once your site passes security testing, it’s recommended that there be a code freeze—meaning no new changes should be introduced, unless another round of security testing is planned.
Build on a Safe Platform
The easiest way to launch a successful and secure site is to start with a framework that offers considerable security benefits out of the box. Drupal is an open source CMS that can easily support a high traffic site with complex features, and it has one of the largest communities of open source contributors maintaining it. Not only that, but there’s a <a href=”//security.drupal.org/team-members”target=”_blank” rel=”noopener noreferrer” title=”Opens in a new window”>dedicated security team that provides security oversight, announcements, and patches to keep the platform secure.
Secure Your Application
With your new project on a widely supported and secure CMS, you might want to consider further restricting access to administrative functions like content creation and editing. There are a few ways to accomplish this, and they can be layered together to ensure the CMS is protected from being defaced or otherwise breached.
Multi-factor authentication
The first and arguably simpler form of protection is to enable multi-factor (MFA) or two-factor (2FA) authentication. Many popular services you already use offer this level of security, and it usually works like this:
- Access your application’s login screen
- Provide basic credentials to log in (username and password)
- Complete a second layer of authentication, such as inputting a one-time use code sent to the authorized account holder via SMS
- Access the application
Multi-factor authentication works because just having a username and password is not enough to gain access to an application.
Content editing over VPN
Another way to protect your application is to prevent visitors from being able to access your site’s login screen to begin with. Normally, anyone can access your login screen if they know the path to it, which opens up your site to brute force login attempts. While it means your editors will need to jump through a few extra hoops to do their work, blocking requests to these pages will make your site more secure.
This configuration is more complicated than a multi-factor approach, as it requires you to have separate servers accessible only to users who have already logged in to a VPN. On the publicly accessible servers, the paths to login screens are blocked and inaccessible by visitors. This provides a great level of security, especially when coupled with multi-factor authentication.
Put a limit on login attempts
Out of the box, many systems don’t limit the number of login attempts a user is allowed to make. Preventing users from trying to login after a certain number of attempts, or limiting the number of attempts within a span of time is a good way to thwart attackers. Drupal’s Login Security module provides some configurable settings for how to handle failed login attempts.
DDoS Protection
Any site can be the target of a Distributed Denial of Service (DDoS) attacks, but often the bigger the site, the more likely it will be targeted with an attack. DDoS attacks overwhelm a site’s resources with requests from many locations at once, making it difficult to just block a single IP to stop the attack. Successful DDoS attacks will cause a site to stop responding to legitimate visitor requests and can quickly impact your business.
The simplest solution to prevent and monitor for DDoS attacks is to route traffic through a service that provides DDoS protection as a service. Often, these service providers offer additional benefits like static page caching to speed up your site, or rate limiting rules for specific pages.
Avoid server strain with rate limiting
Rate limiting allows you to throttle the number of requests to certain pages of your site, which can be especially useful for features like web forms that require more overhead than serving static content, and are often abused by spam bots.
A lot of vendors offering broad DDoS protection services can configure complex rate limiting rules to limit how many requests can be received by specific paths on your site. If your application offers an API, or if you have forms on the site that could be abused by an attacker trying to overload your site with malicious traffic, it could be worthwhile to consider rate limiting.
Wow, that was a lot to digest
There’s a lot to consider and plan for with large digital projects, and a lot of decisions need to be made along the way. The best way to be prepared is to consider security and other critical aspects of a successful launch early on and to work with a team you can trust to help with vendor selection and communication.
To work with a team that understands how to manage all of these solutions, please feel free to speak with us anytime.